Inventory & Purchasing Tool — User Manual
For the people who use the tool day to day — site admins, purchasers, receivers, housekeeping and field staff, and viewers. How to do each task, what to do when something looks wrong, and who to contact.
Every screen recording below is of the tool as it is deployed today. The recordings were made against a test brand, so the item names and quantities are made up — the buttons and the order of steps are exactly what you'll see.
Day-to-day tasks are in The everyday tasks. If you set a brand up or manage people, carry on to the two Admin parts (no recordings there — those screens are mostly forms).
What this tool is for
It keeps each brand's supplies stocked: it tracks what you have on hand per location, tells you what's running low against your targets (pars), helps you price-check and place orders, and receives shipments back into stock. Catalog and cost come from Breezeway; usage is pulled in automatically each day.
How it all fits together
Worth two minutes before the how-tos, because it explains why a number moved.
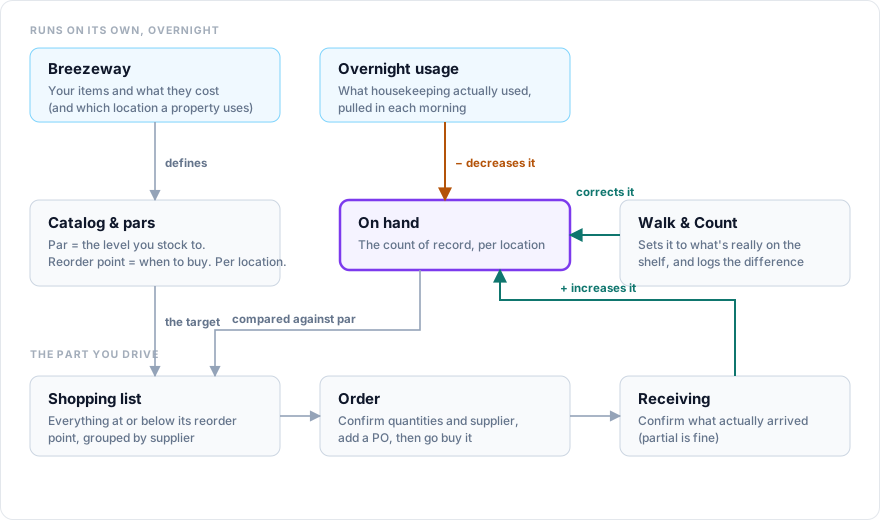
Everything revolves around one number: on hand, per location. Four things move it, and only two of them are you:
| What it does | |
|---|---|
| Daily usage | Housekeeping's consumption is pulled in automatically and decreases on hand. Nobody enters it. Timing below. |
| Receiving | Confirming a delivery increases on hand by what arrived. |
| Walk & Count | Sets on hand to what's really on the shelf, and records the difference as a variance. |
| Breezeway | Doesn't touch on hand — it supplies the items and costs, and which location each property draws from. |
The buying loop then falls out of a single comparison: on hand vs. par. Anything at or below its reorder point lands on the Shopping list; you confirm quantities and suppliers and it becomes an Order; when it turns up you Receive it, and on hand goes back up. That's the whole cycle.
Three consequences worth knowing, because they explain most surprises:
- A blank par means the item is invisible to buying. There's nothing to compare against, so it will never be suggested no matter how low it gets.
- Pars are per location, but item settings are shared. Changing a par affects one warehouse; changing a pack size or a supplier affects everywhere.
- Stock only moves for things you actually stock. A one-off expense line, or an item marked not stockable (labour, fees), is bought and received and costed — but it has no shelf, so on hand doesn't change.
What runs on its own, and when
Three jobs run daily without anyone touching them. Times are UTC, because that's how they're scheduled — so the local time shifts by an hour when the clocks change.
| When (UTC) | What happens |
|---|---|
| 06:00 | Catalog refresh. Reads your supply list from Breezeway and updates costs. New Breezeway supplies are added here; supplies that have disappeared from Breezeway are archived — history is kept, nothing is deleted. |
| 06:30 | Location routing refresh. Re-reads which inventory location each property draws from. |
| 13:00 | Usage. Reads the housekeeping tasks completed since it last ran and decrements on hand. It can't run overnight, because the upstream data isn't complete until about 8 AM Eastern. |
For a rough local sense, 13:00 UTC is around 9 AM Eastern, 8 AM Central, 3 AM in Hawaii. So usage has landed by the time the working day starts, wherever you are. It used to run three hours later, which meant on hand visibly dropped mid-morning for mainland users; that's what the earlier time fixes.
The catalog is one-way: Breezeway is the master and the tool never pushes item changes back to it. That's why a cost correction belongs in Breezeway, and why the Dashboard points you there when something is received above its Breezeway cost.
Both Breezeway jobs also have a manual button on the Dashboard ("Manual Breezeway Sync", "Re-sync Consumption from Snowflake"). Those are for same-day needs and recovery — if you add a supply in Breezeway this morning and want to buy it today, "Sync now" saves you waiting for tomorrow.
Why an item isn't showing up yet
This is the most common confusion, and it's a chain — an item has to clear each step before it appears on the next screen:
- It exists in Breezeway → the 06:00 refresh (or "Sync now") creates it in the tool. Until then the tool has never heard of it.
- It appears in Catalog & pars. At this point it is not yet in Inventory and not on the Shopping list.
- It has a par at that location → now it appears in Inventory for that warehouse. This is the step people miss: an item with no par for a location is invisible on that location's Inventory screen, even though it's in the catalog. Pars are per location, so setting one at Kahana does nothing for Kihei.
- On hand is at or below its reorder point → now it appears on the Shopping list.
Two other things hide an item from Inventory and Shopping regardless of pars: it's been archived (usually because it vanished from Breezeway), or it's marked not stockable (labour, fees). Both still show in Catalog & pars, so that's the screen to check first when something seems missing.
Getting started
- Go to the tool's URL and sign in with your company Google account ("Continue with gomonarch.com"). If you're outside gomonarch.com, you'll have been sent a separate login invite — use that. That invite link expires, so if it's gone stale, ask your admin to resend invite rather than assuming your account is broken.
- If you work across brands, use the brand switcher (top right) to pick the one you're working in. Everything on screen is for that brand.
- Most screens also have a Warehouse picker. That scopes on-hand, pars and the shopping list to one location — check it's the one you mean.
- What you can see and do depends on your role (below). If a button or page you expect is missing, your role may not include it — ask an admin.
- 📖 Help & how-to in the sidebar opens this manual in a new tab, so you can get back to it from inside the tool without hunting for the link.
Roles at a glance
| Role | Can do |
|---|---|
| Site Admin | Everything for their brand, including Admin settings |
| Purchaser | Count, edit catalog/pars, shop + place orders, receive, reports |
| Receiver | Count, edit catalog/pars, receive, manage/view orders, reports |
| Field / Housekeeping | Walk & count + look up items |
| FP&A Viewer | Read-only: dashboard, inventory, catalog, orders, reports |
| Monarch Admin | All brands + org-level management |
The everyday tasks
See what's low — Dashboard
Four tiles tell you whether the brand is healthy, and each one jumps to its list: Shopping queue (what the tool suggests buying), Below reorder (what's actually short at this location), Active orders (everything owed to you), and Order history. Below them, Needs attention lists the exceptions worth a decision — an order past its expected delivery window, or a cost that needs updating in Breezeway.
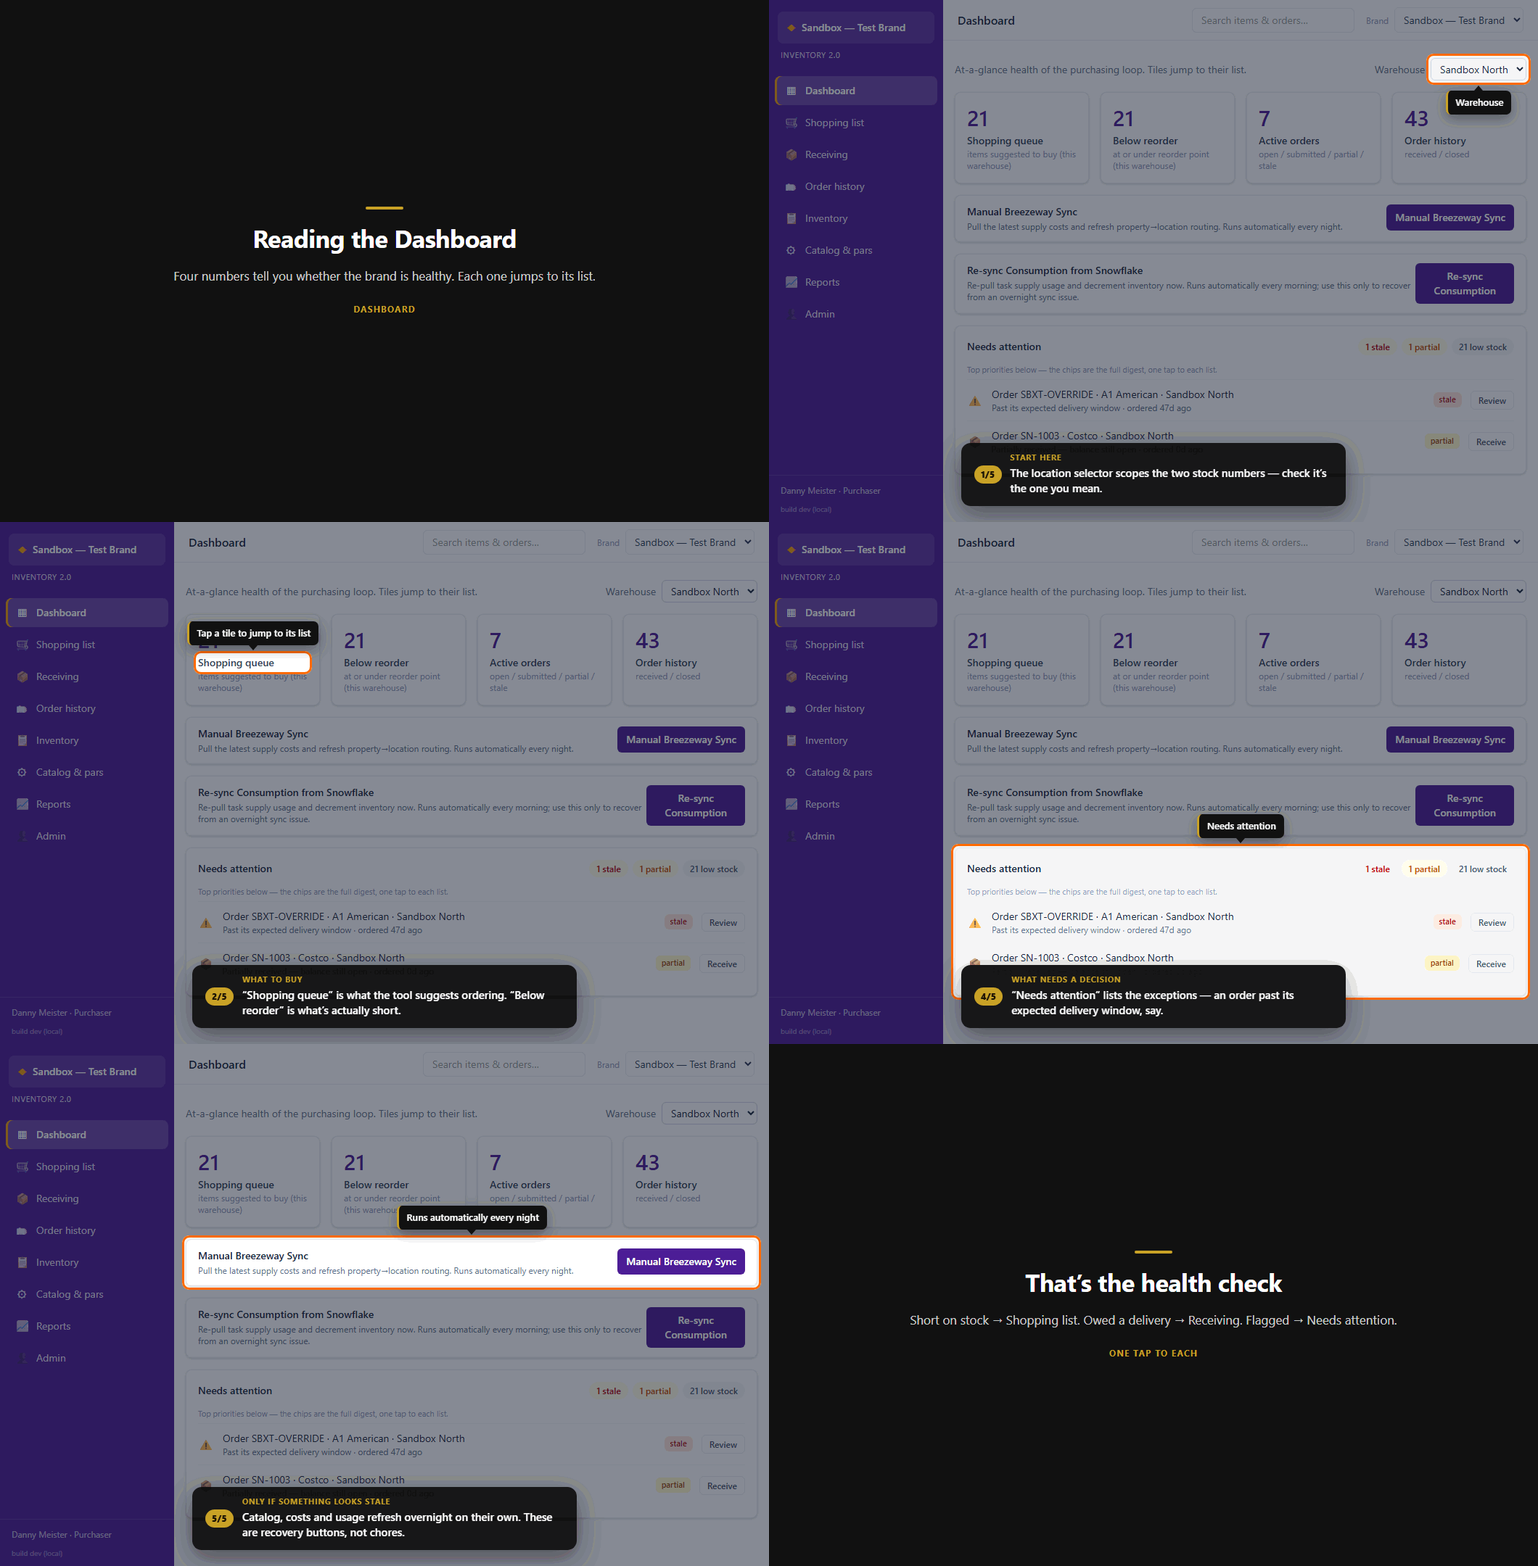
The two sync cards ("Manual Breezeway Sync", "Re-sync Consumption from Snowflake") are recovery buttons, not chores — catalog, costs and usage all refresh on their own every day (see What runs on its own, and when). Use these only for a same-day need, or when something looks stale.
Check / update on-hand — Inventory
Walk & Count is the daily loop. Pick the location you're standing in, start a session, then work down the shelf: narrow to a category, pick the item, type what you counted, and Commit count.
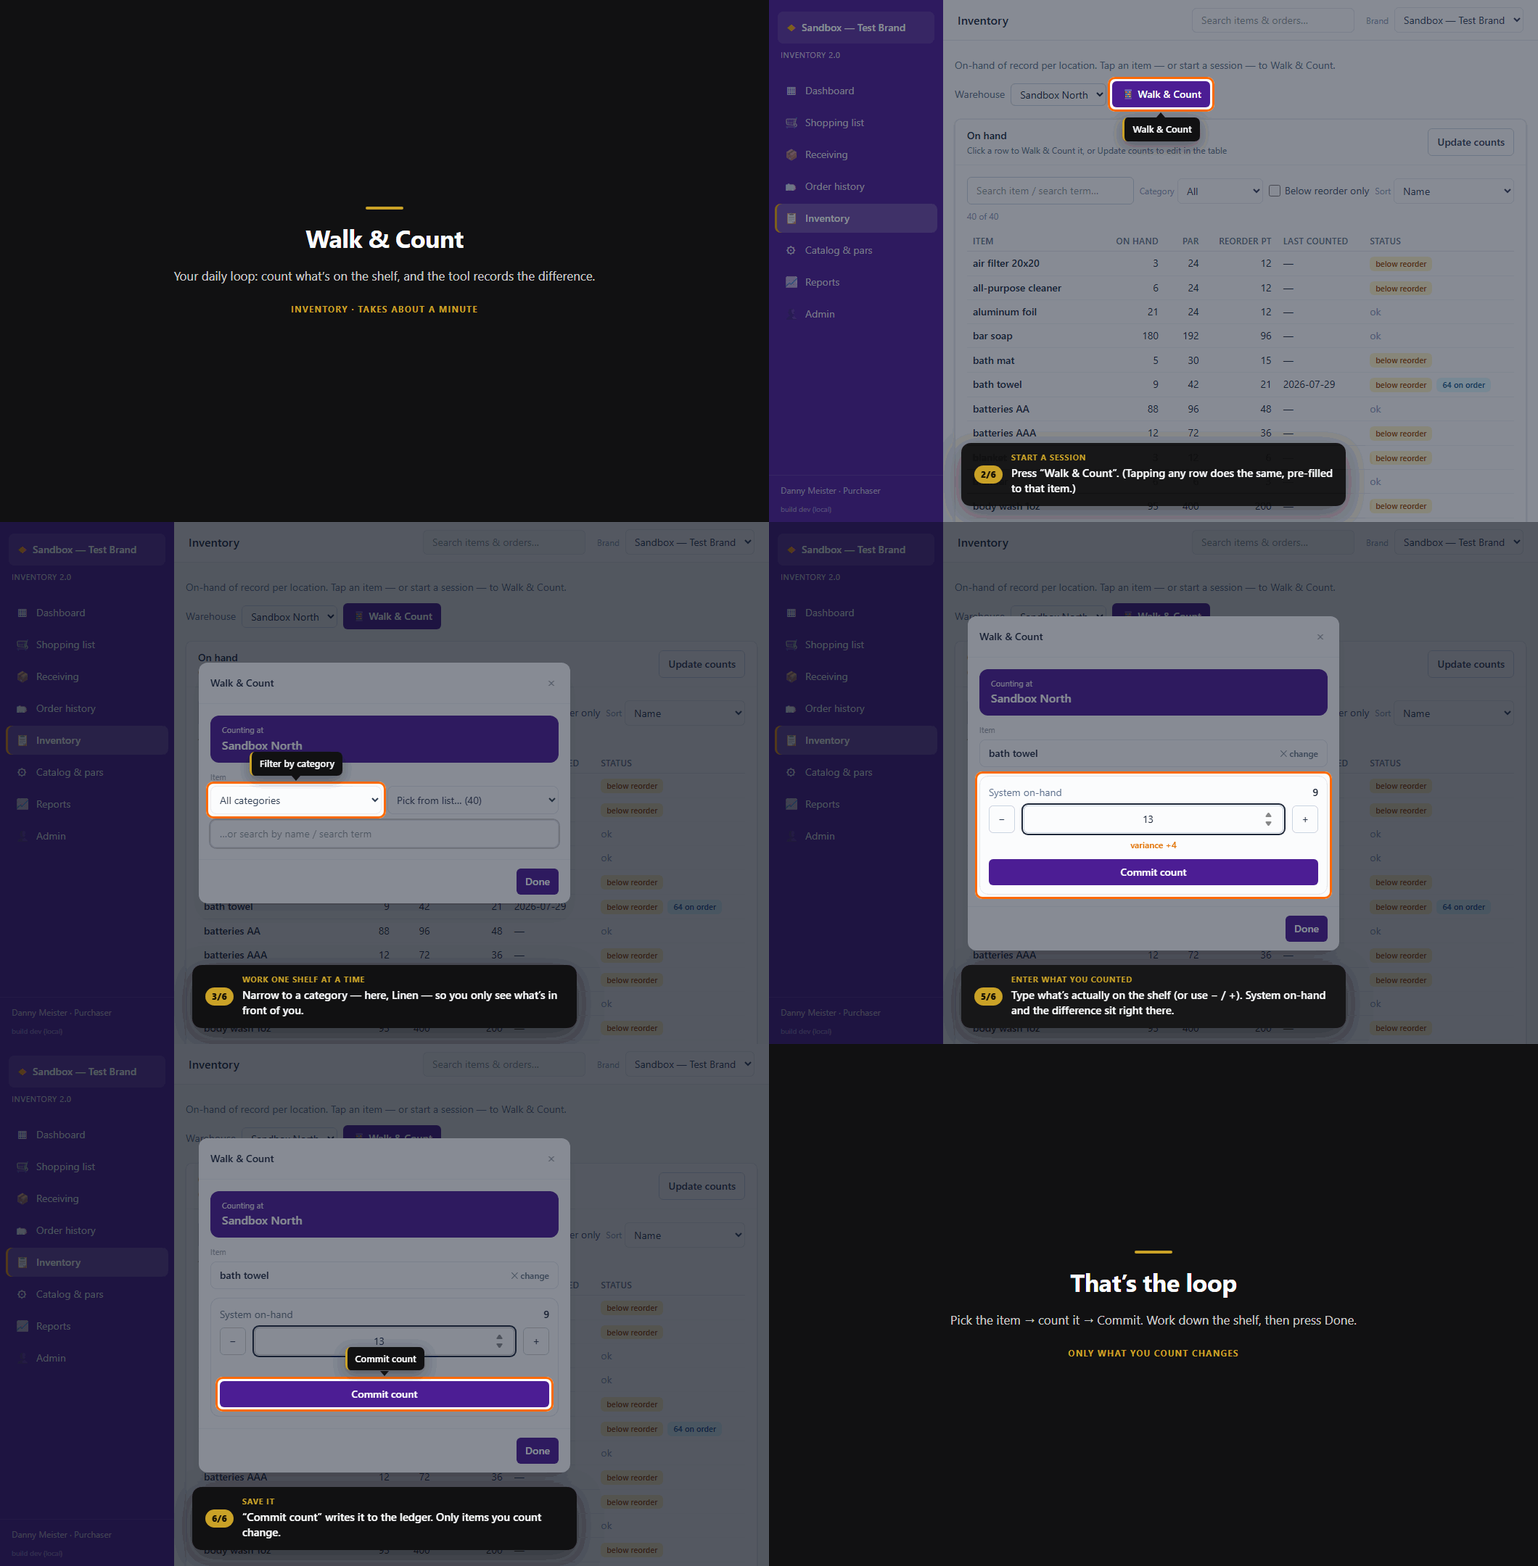
- Filter by category to see one shelf at a time, then Pick from list — you don't need to know an item's exact name. There's also a search box if you do.
- The panel shows the tool's System on-hand, your count, and the difference between them. A gap is normal; it's recorded as a variance so shrink and miscounts stay visible. Items you counted appear under Counted this session, and the picker resets for the next one.
- Only items you count change. Nothing else is touched.
- Update counts is the alternative: edit several on-hand values straight in the table, then Save counts. Same effect, better for a desk than a shelf.
Where variances show up
A count that disagreed with the system isn't a problem to hide — it's the signal for which items need counting more often. Count variance at the bottom of Inventory is where you read them back.
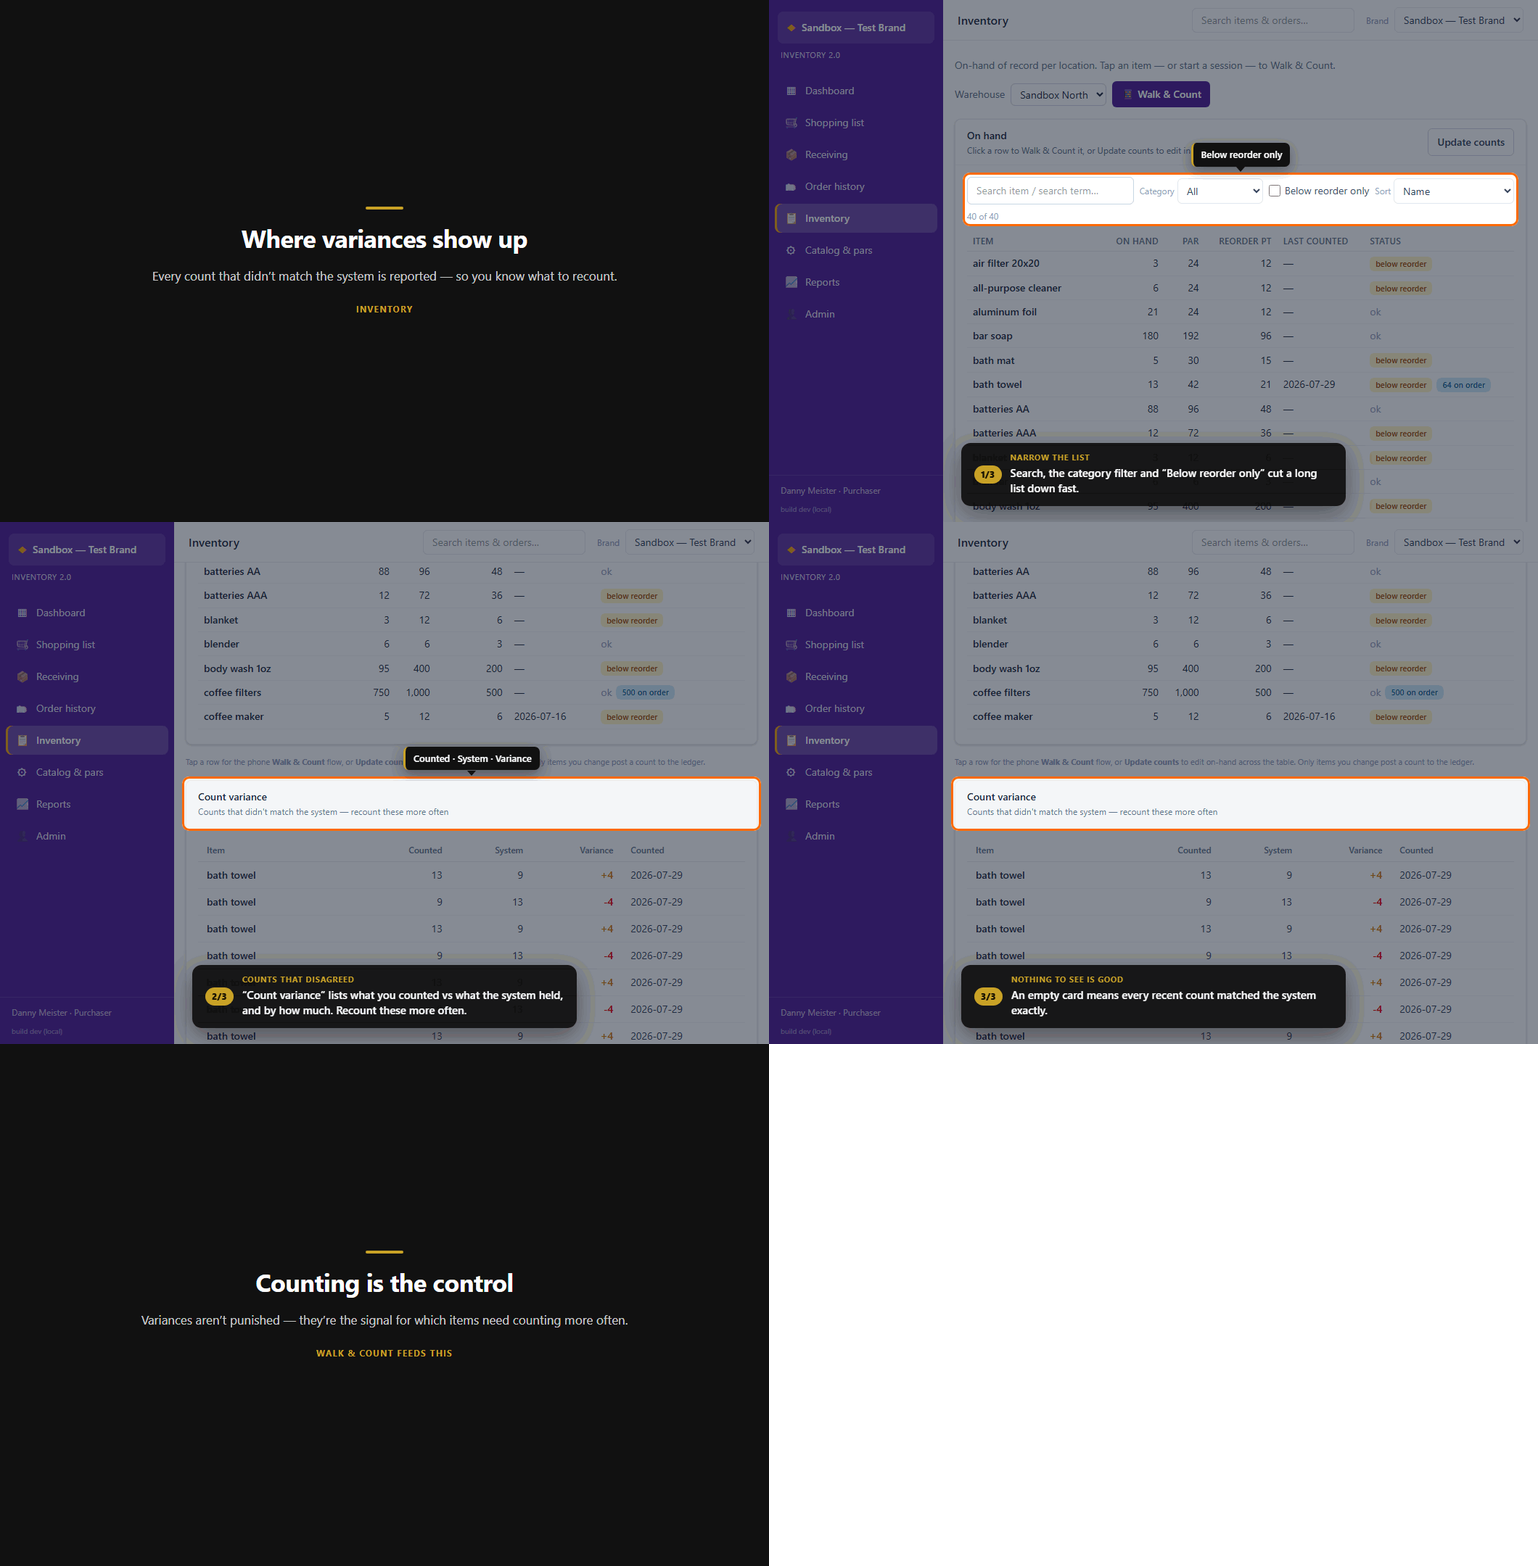
A negative variance means there was less on the shelf than the system thought — shrink, breakage, or a count that got missed. An empty card means every recent count matched.
Reorder — Shopping list
The list is everything at or below its reorder point, grouped by supplier, with a suggested quantity that rounds to whole packs.
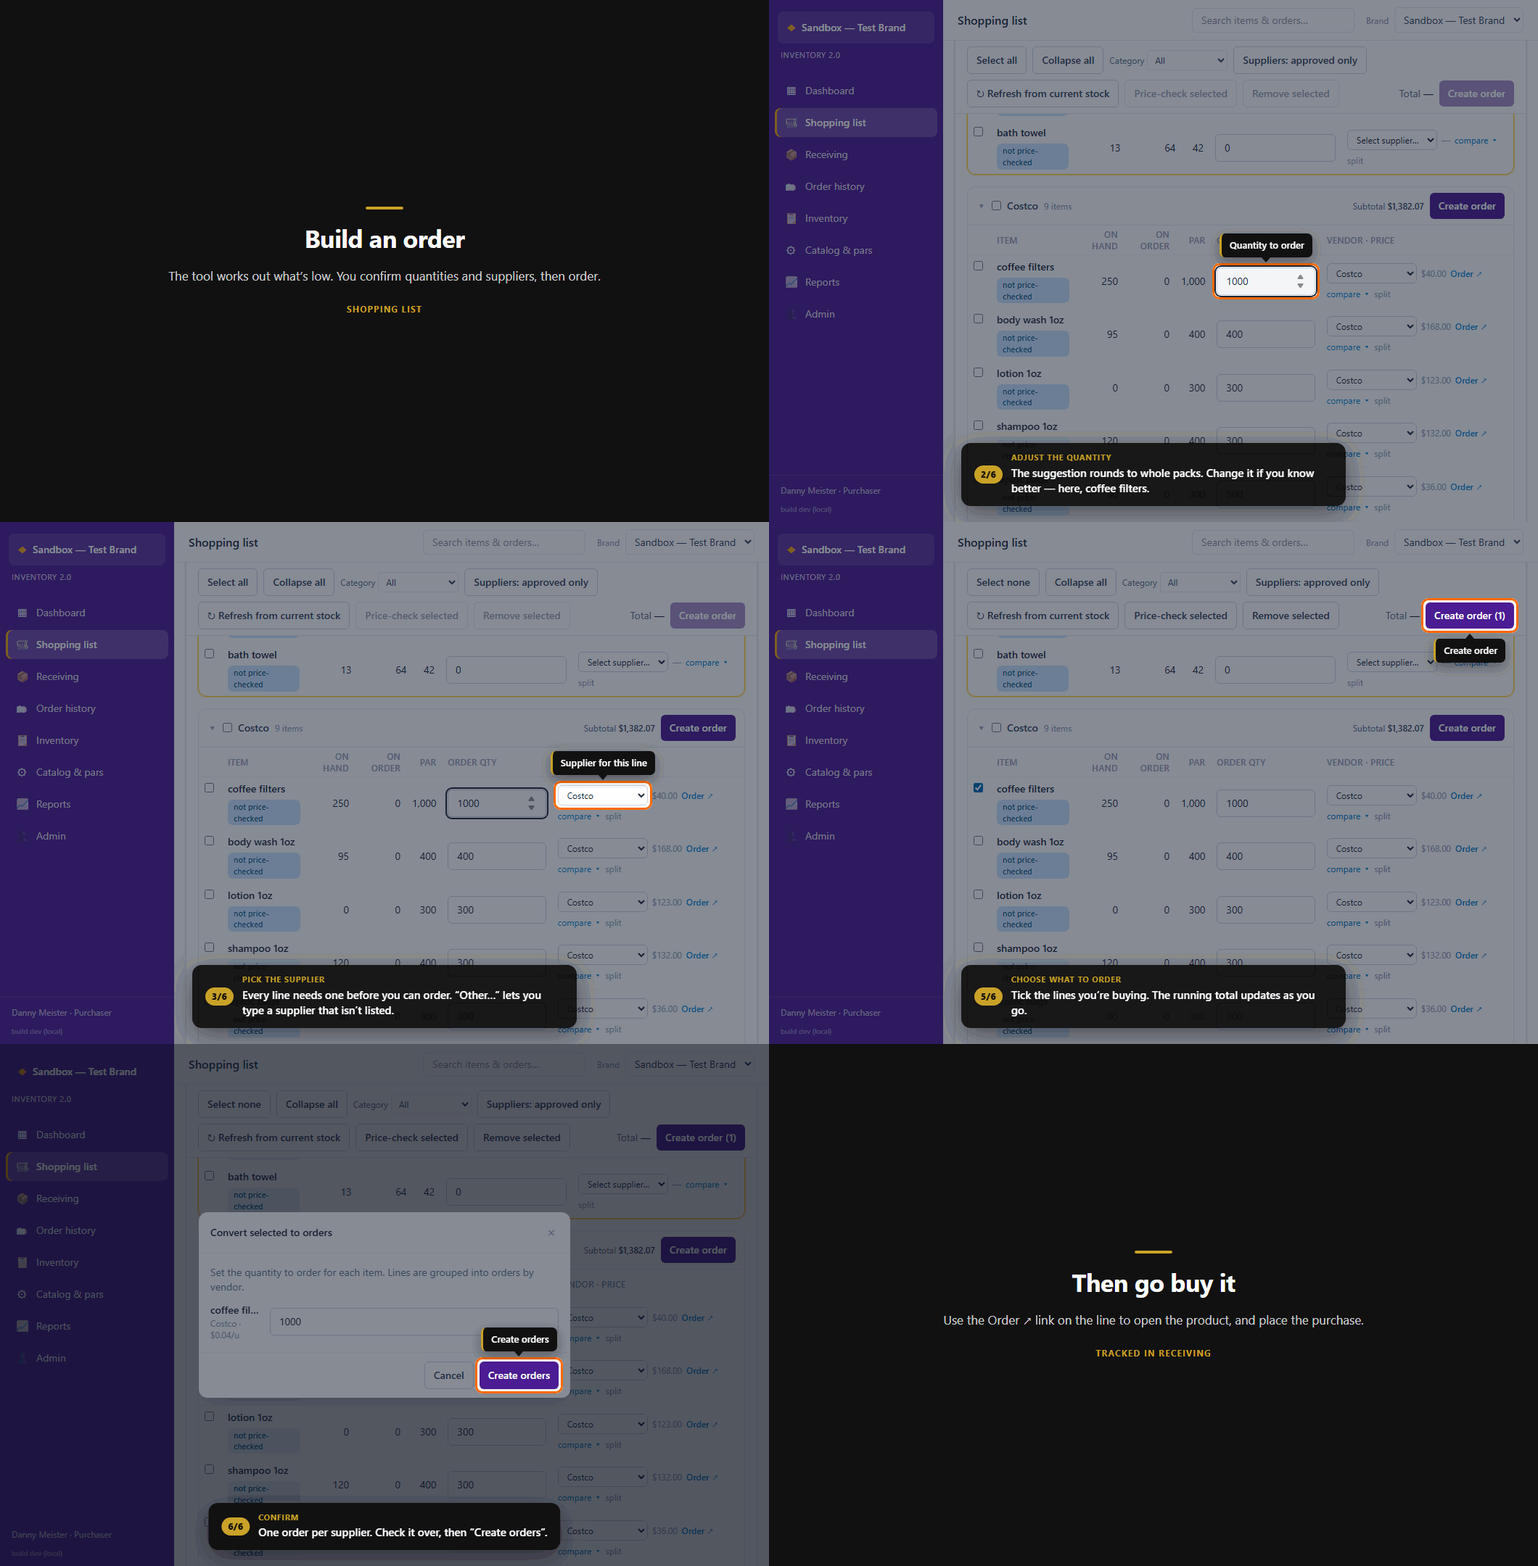
- Adjust quantities if you know better than the suggestion.
- Pick a supplier for each line — or "Other…" to type one that isn't listed. Every line needs a supplier before it can be ordered.
- compare on a line shows what each supplier charges per unit; pick the option you want and the panel closes itself, with your price now on the row. An Order ↗ link then opens the product so you can actually buy it.
- Tick the lines you're buying and hit Create order. You get one order per supplier, and each becomes a tracked order in Receiving.
If a line says "set price" instead of "compare", that item has no price history yet — which is normal on a newly onboarded brand. Type the price you found and apply it; that's what unblocks ordering.
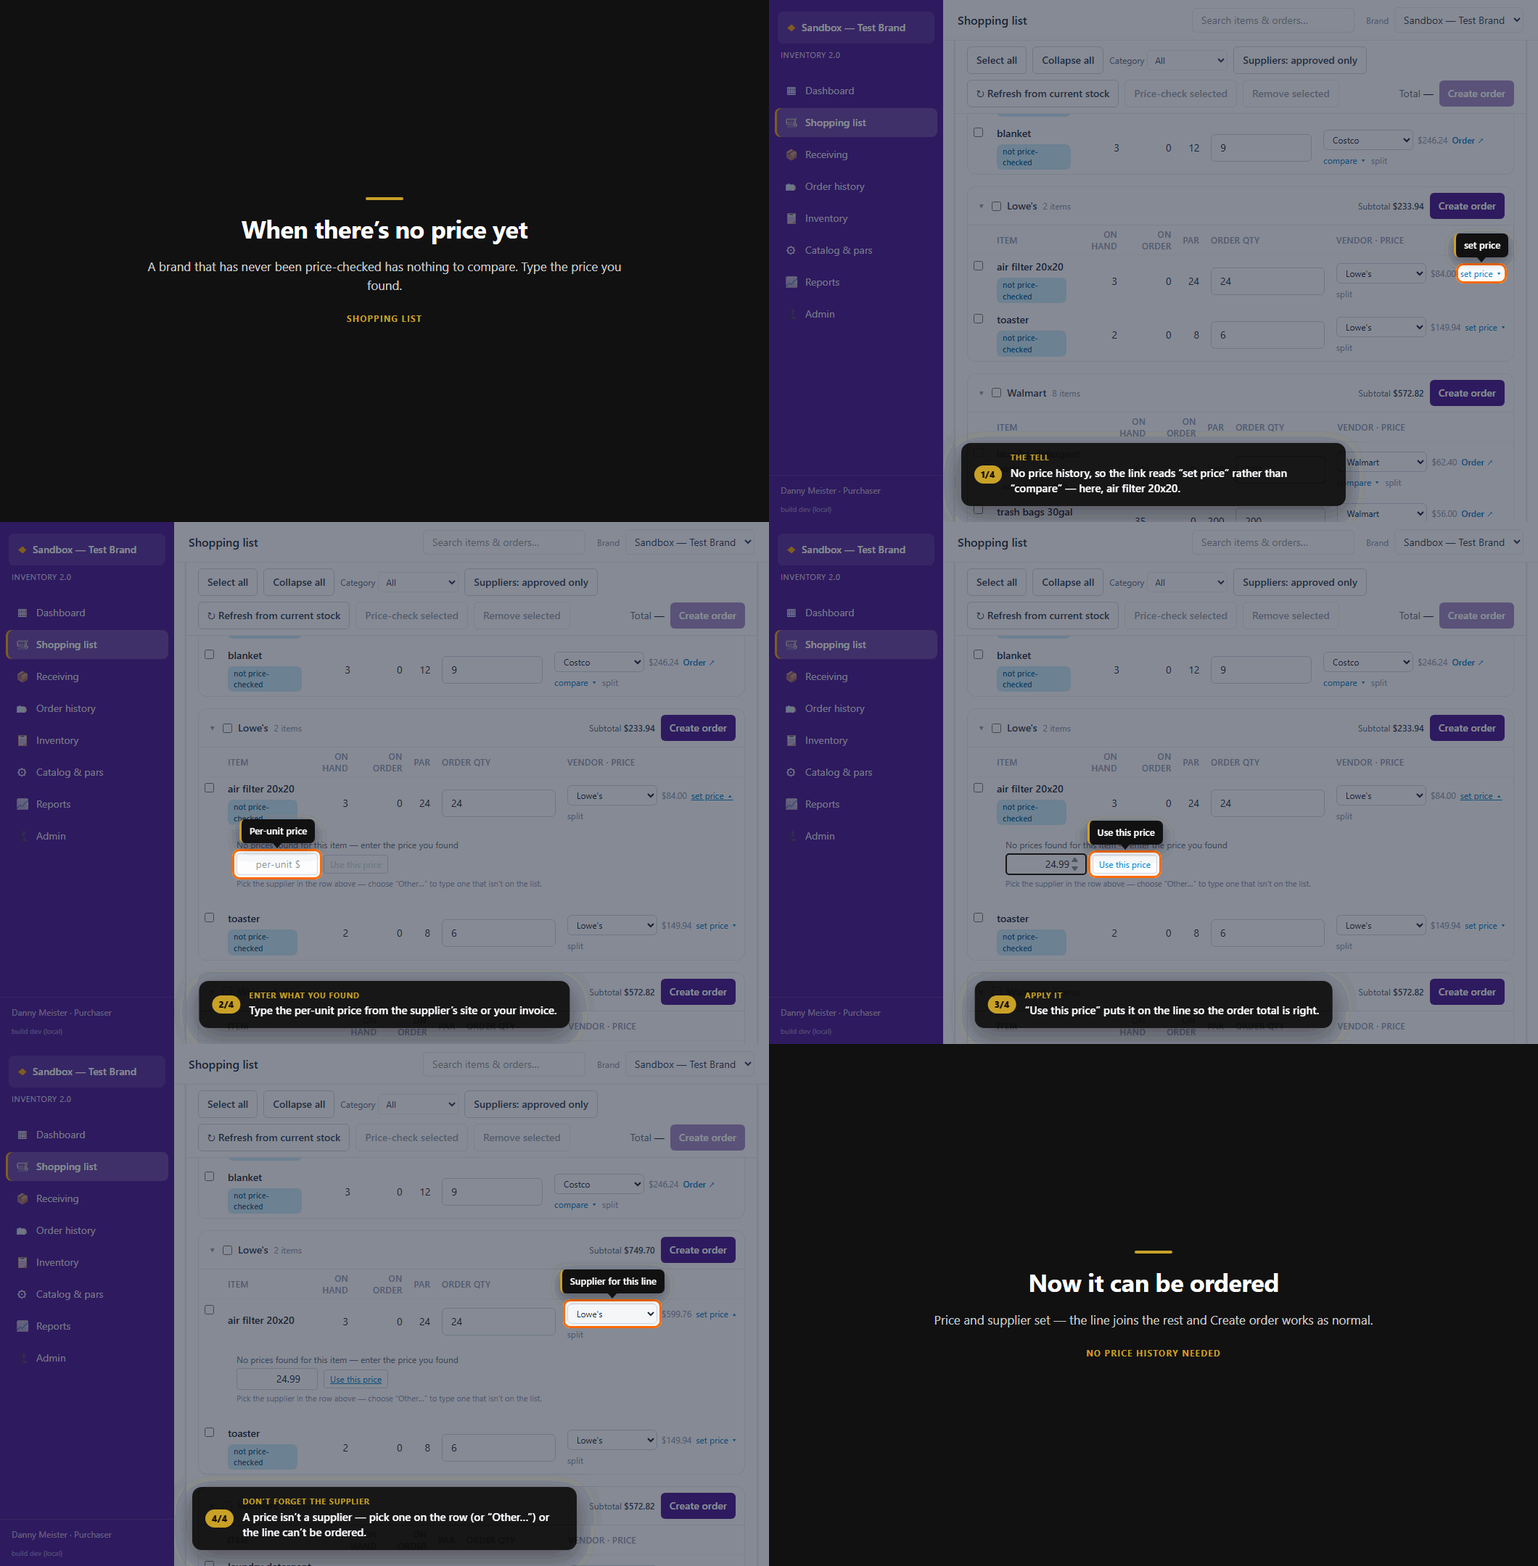
A price is not a supplier — you still have to pick one on the row.
Two more things worth knowing:
- If you leave and come back, your in-progress list is restored. If stock changed while you were away, a red warning appears and the out-of-date quantities are highlighted — click Refresh from current stock to rebuild the list.
- The Category filter narrows the view only. Your working list and running total stay whole, but "Select all" applies to what's visible.
The controls worth knowing
Four things on this page change what you're offered and what you end up buying.
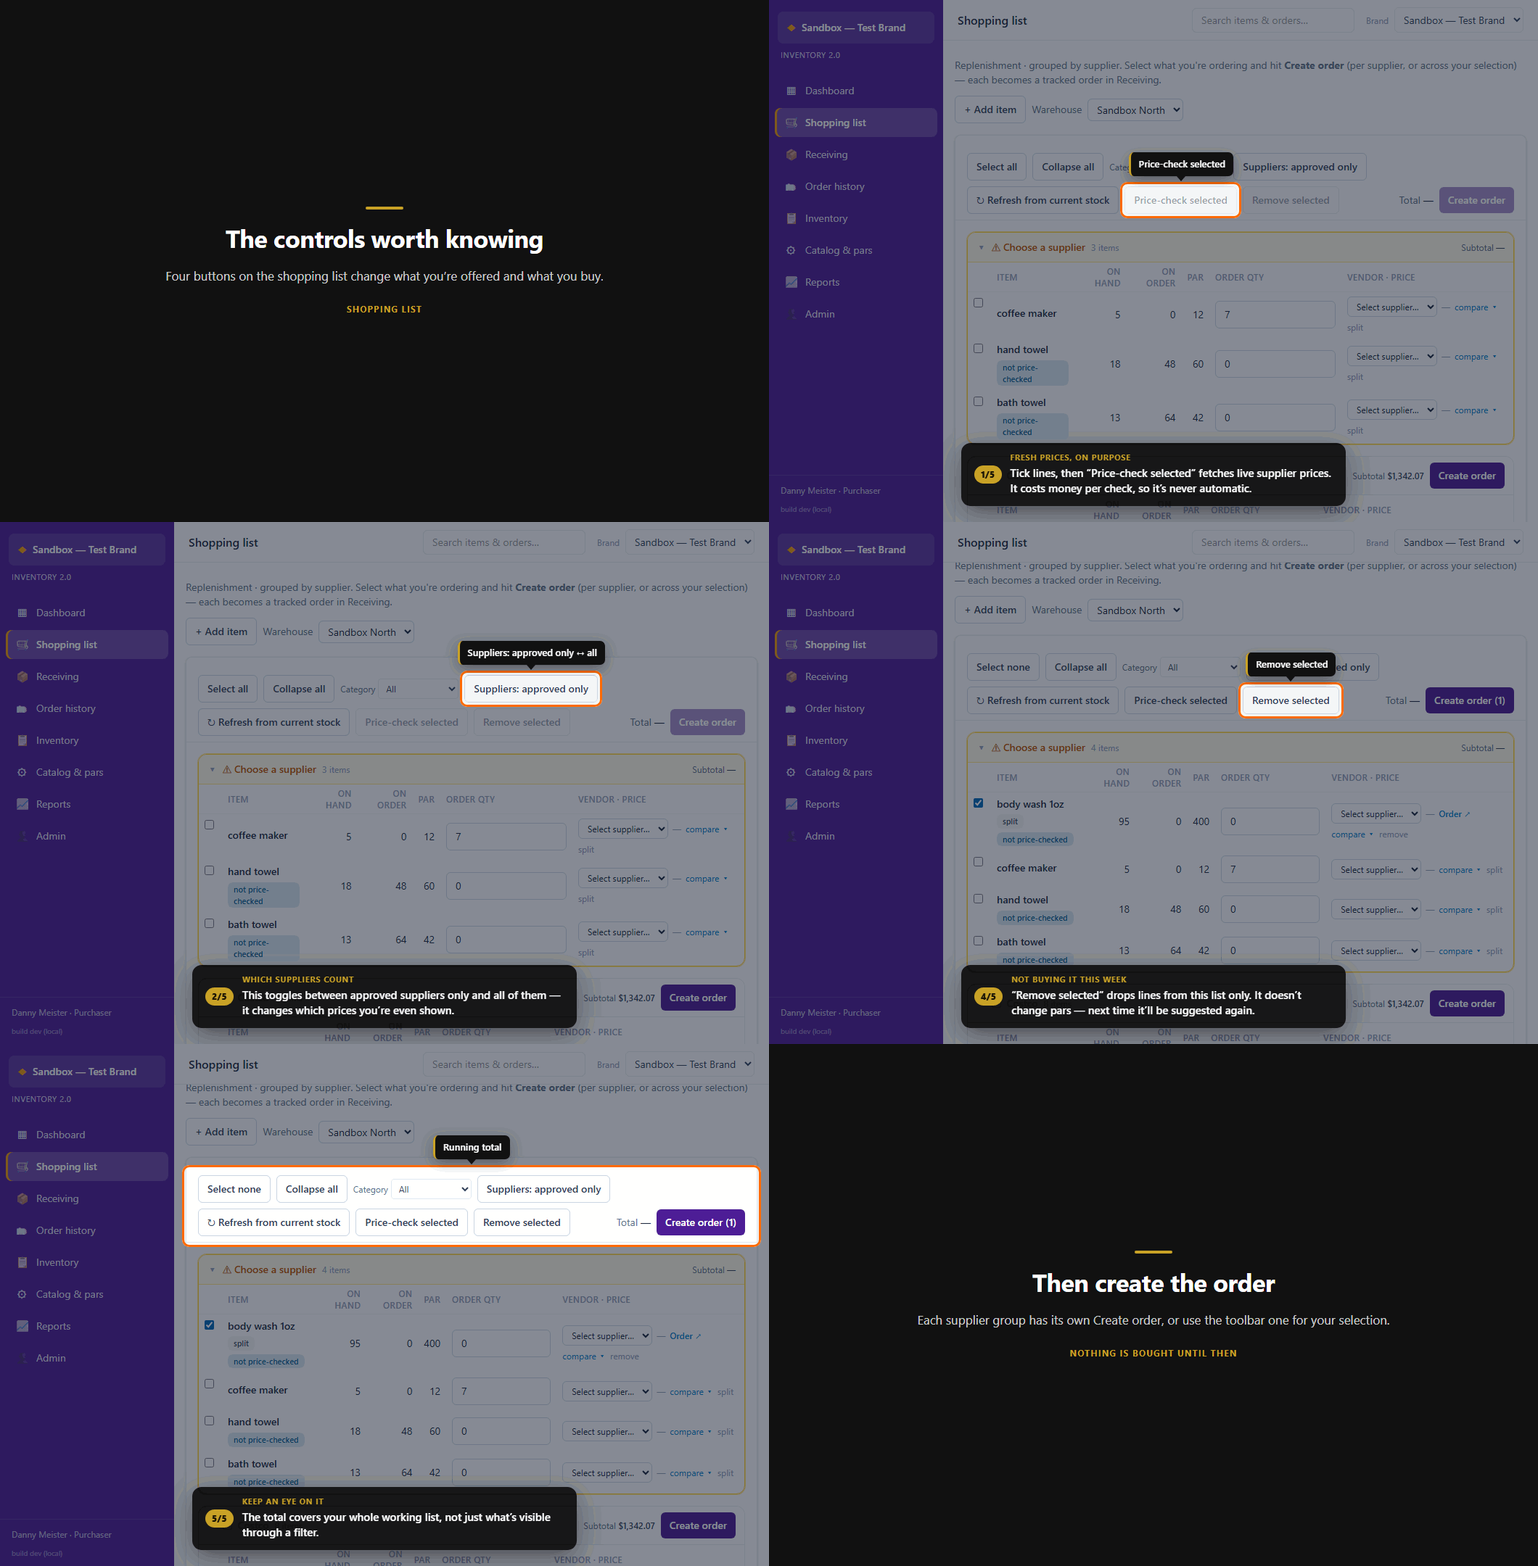
- Price-check selected fetches live supplier prices for the lines you've ticked, searching Google Shopping, Amazon and Walmart and showing you the best matches from all three. Each check costs money, which is why it never runs on its own — and why you select first. Cancel price check stops it and keeps whatever already came back.
- Suppliers: approved only ↔ all changes which suppliers' prices you're shown at all. If a line looks like it has no prices, this is worth a try.
- split divides a line so part comes from one supplier and part from another.
- Remove selected drops lines from this list only. It doesn't touch pars, so the item will be suggested again next time.
Buying something off-cycle — + Add item
Not everything comes from pars. + Add item puts anything on this week's list.
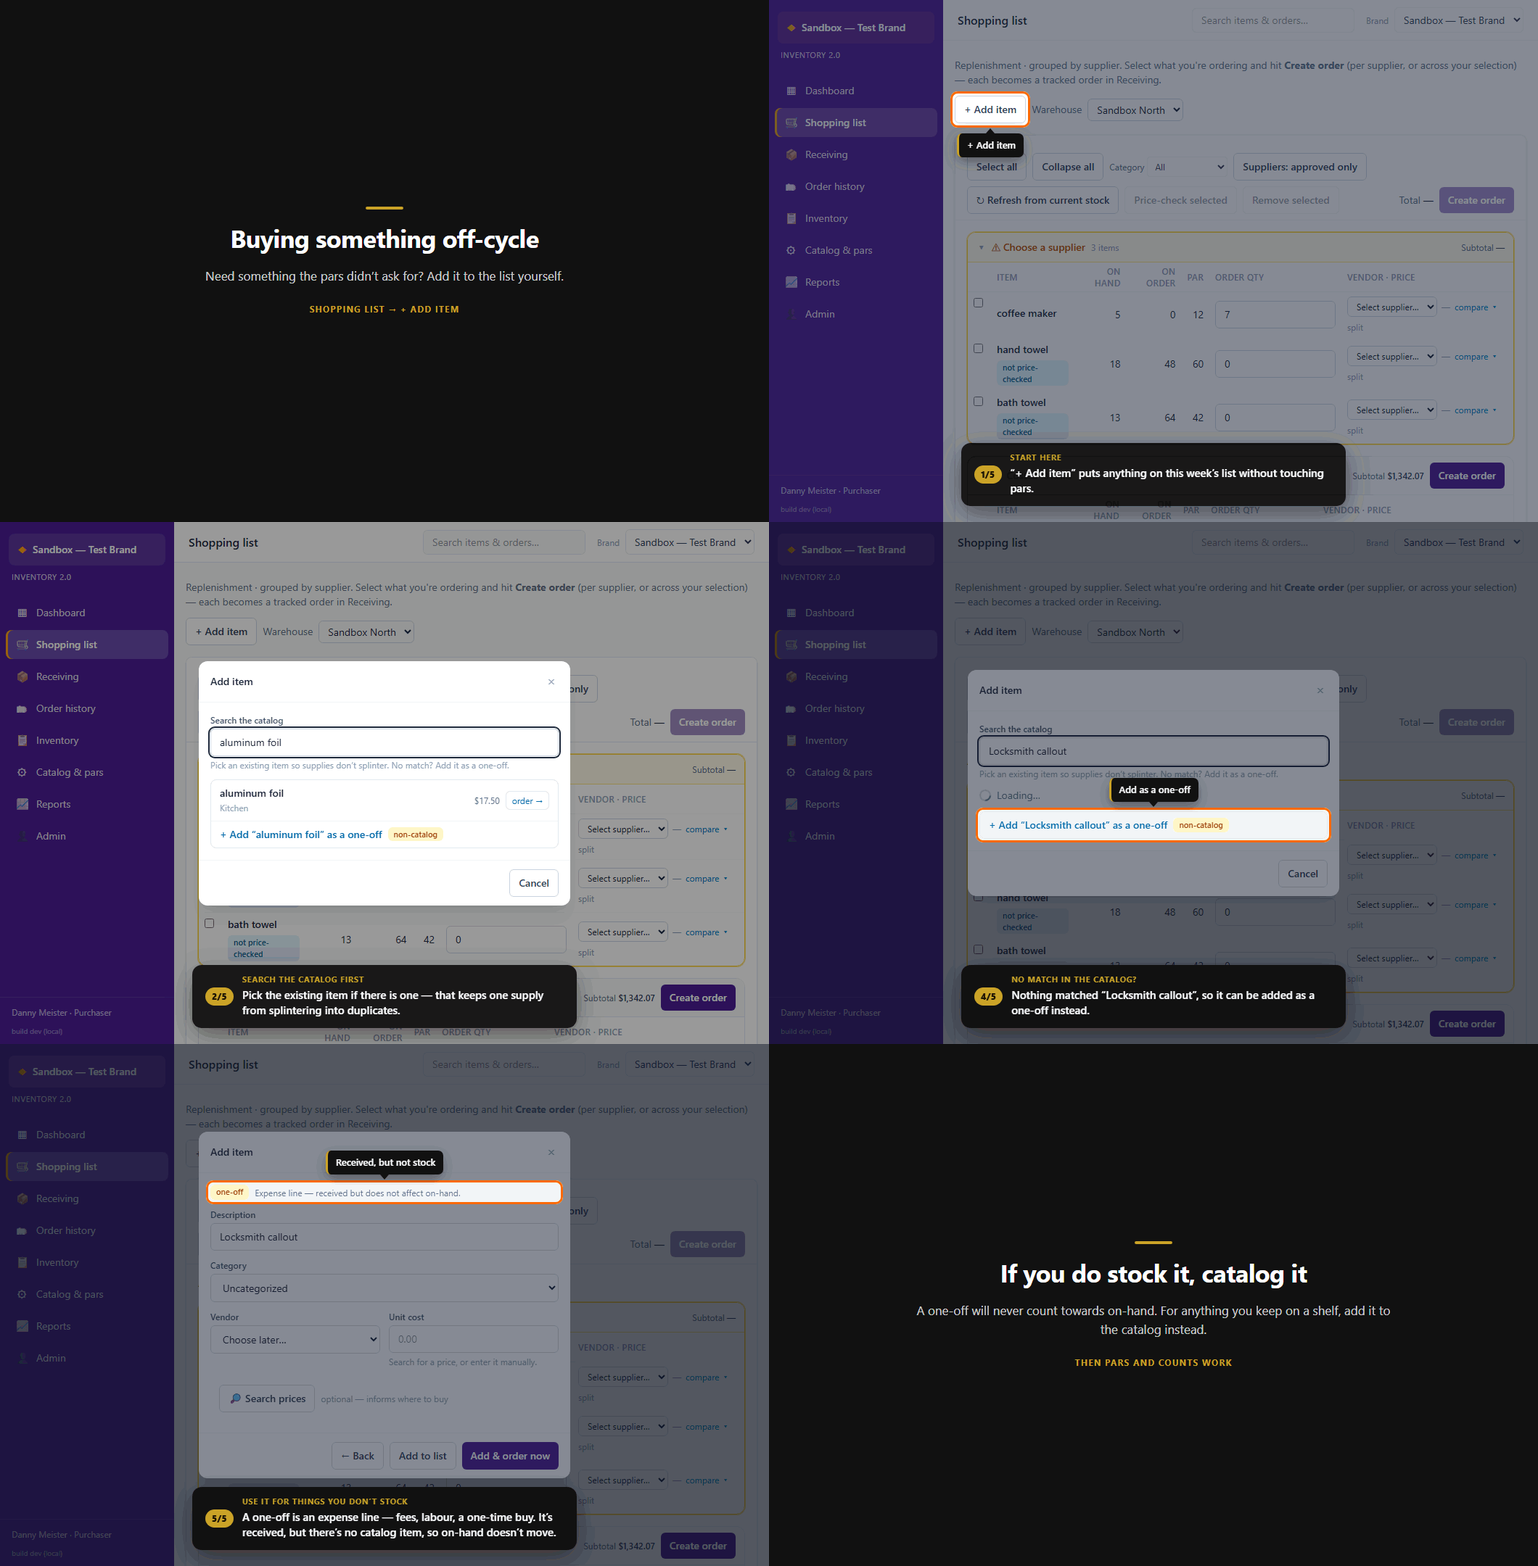
Search the catalog first. If the item already exists, pick it — that keeps one supply from splintering into duplicates, and the line then behaves like any other: choose a supplier, order it, and receiving it moves on-hand normally.
If nothing matches, you can add it as a one-off instead. A one-off is an expense line — a fee, a callout, labour, a one-time non-stock purchase. It gets received and costed, but there's no catalog item behind it, so on-hand doesn't move.
So if it's something you actually stock, don't use a one-off — add it to the catalog instead. Otherwise it will never count towards on-hand, pars won't cover it, and Walk & Count won't see it.
Track an order — submit, chase, cancel
Creating an order isn't the last step. Everything below lives behind "View details →" on the order's card in Receiving — it's one small link, and it's easy to miss.
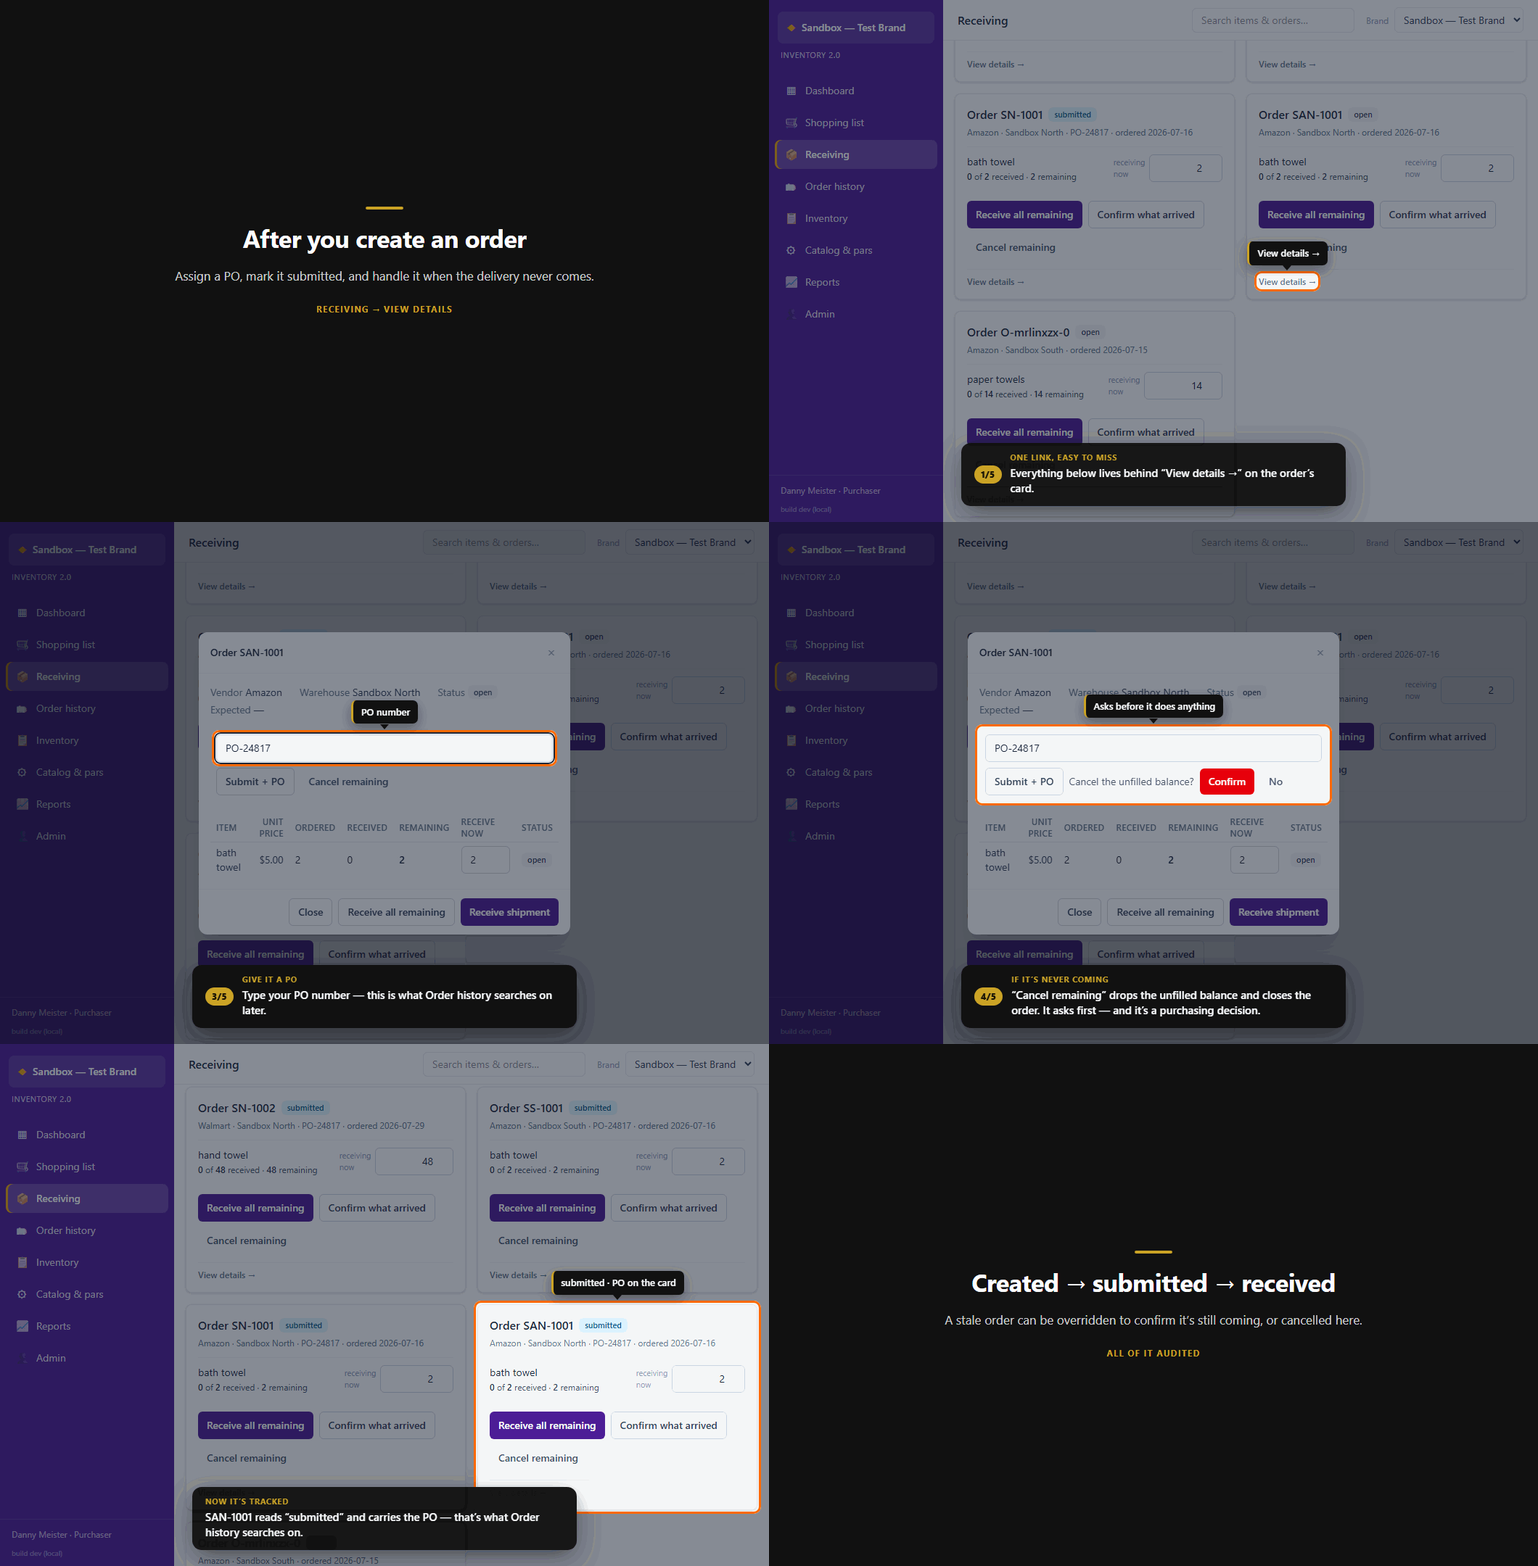
- Submit + PO: type your PO number and press it. This records that the order actually went to the supplier, and the PO is what Order history searches on later. The panel closes and the card then shows "submitted" plus the PO.
- Override stale: when an order is past its expected delivery window it's flagged as stale on the Dashboard and in Receiving. If you've checked and it really is still coming, give a reason and (optionally) extra days. That clears the flag without pretending it arrived.
- Cancel remaining: drops the unfilled balance and closes the order. It asks "Cancel the unfilled balance?" before doing anything. Abandoning a backorder is a purchasing decision — a Receiver sees the button but should check with their purchaser first.
- Reopen: on a closed or fully-received order, give a reason and the received quantities become editable, so you can correct a miscount up or down. Every change posts a correcting inventory entry and is logged.
The order detail panel is also where you see each line's unit price — what you actually paid, not a catalog or live price.
Receive shipments — Receiving
Receiving shows every order still in flight, with what's outstanding on each line.
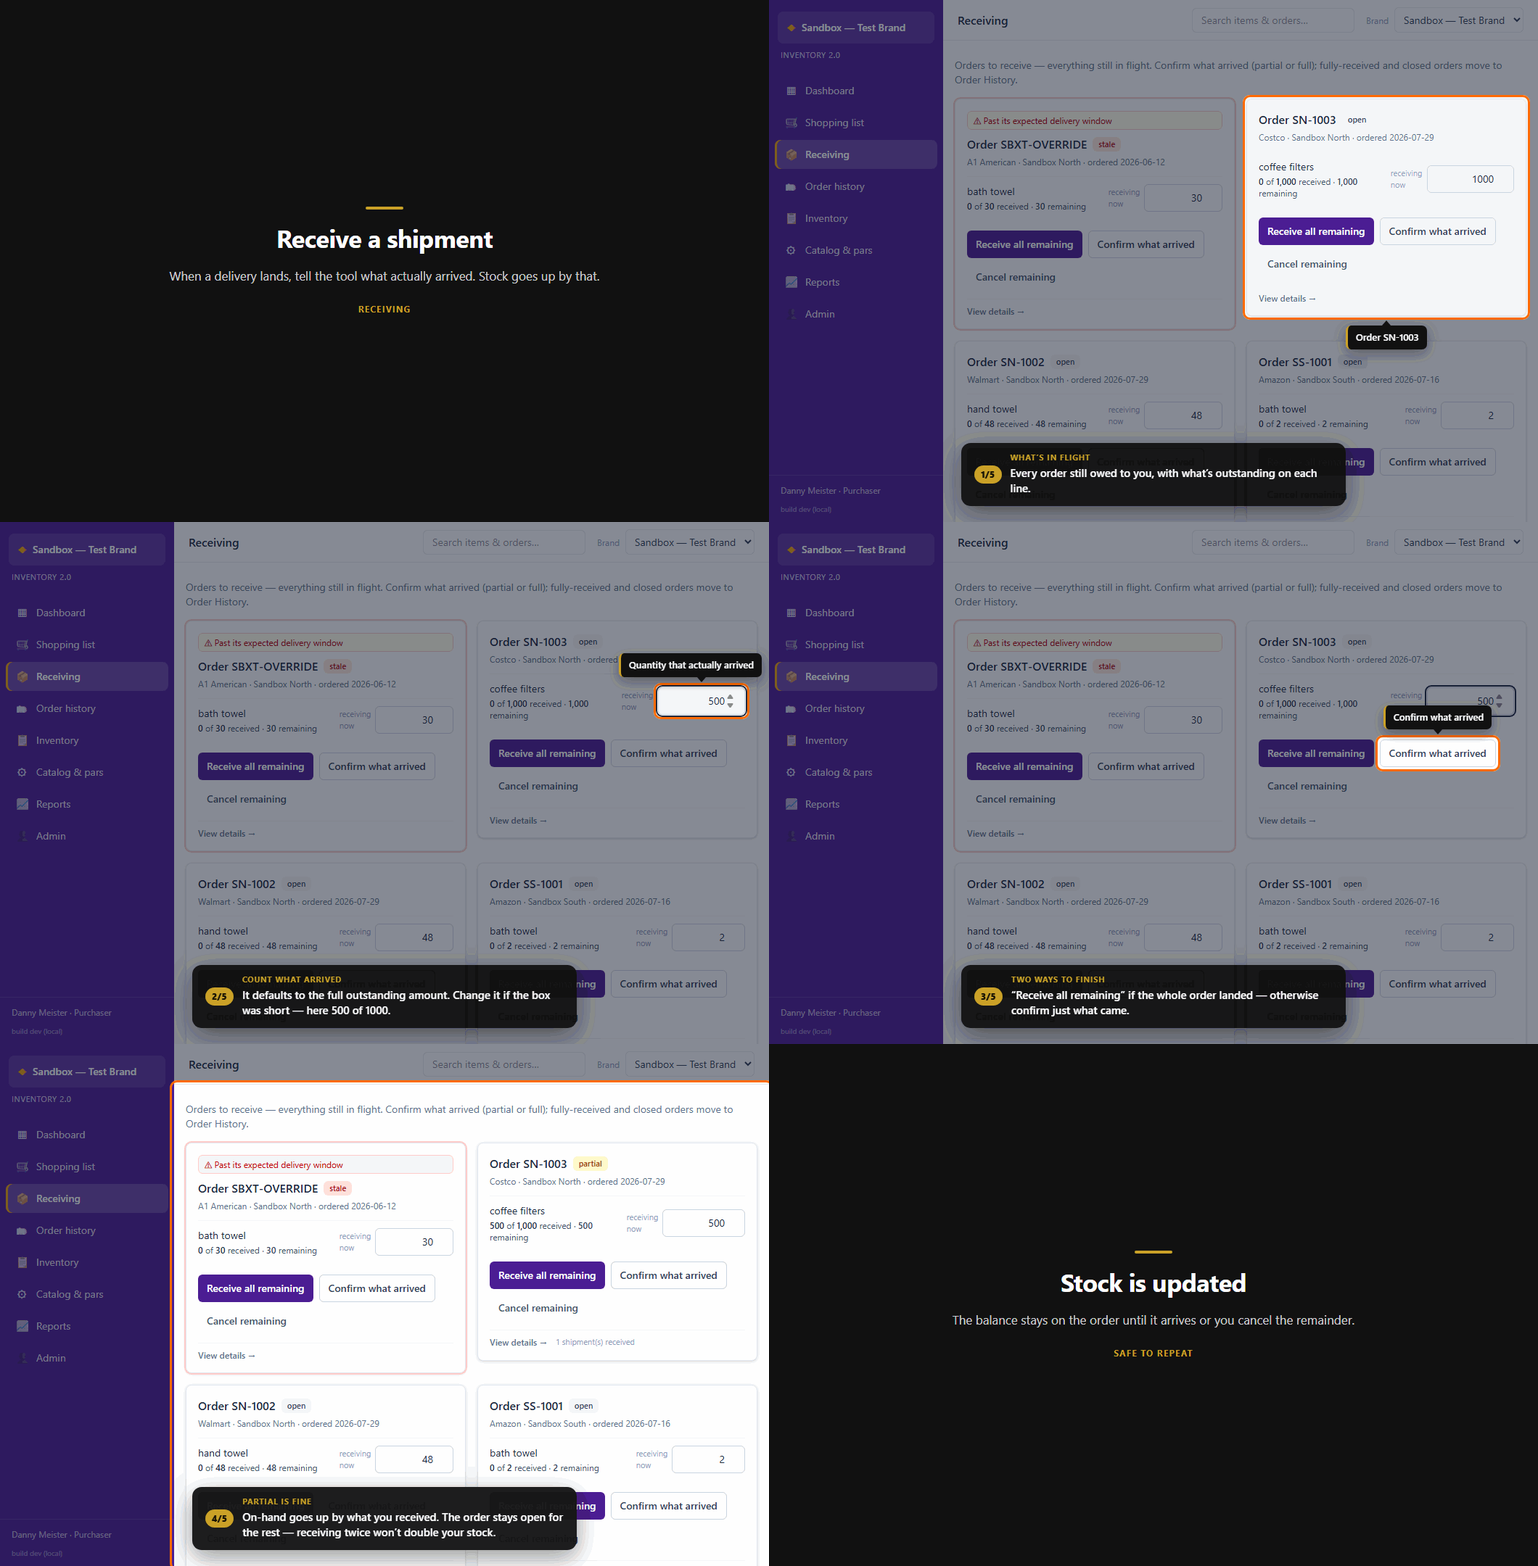
Find the order, then either Receive all remaining (the whole thing landed) or change the quantity and Confirm what arrived. On-hand goes up by what you received, and a partial delivery stays open for the balance. Receiving the same shipment twice won't double your stock.
If you got the count wrong
Miscounts at the dock are fixable — you don't have to live with them or raise a ticket. Find the order in Order history (received and closed orders live there), open it, and Reopen it with a reason.
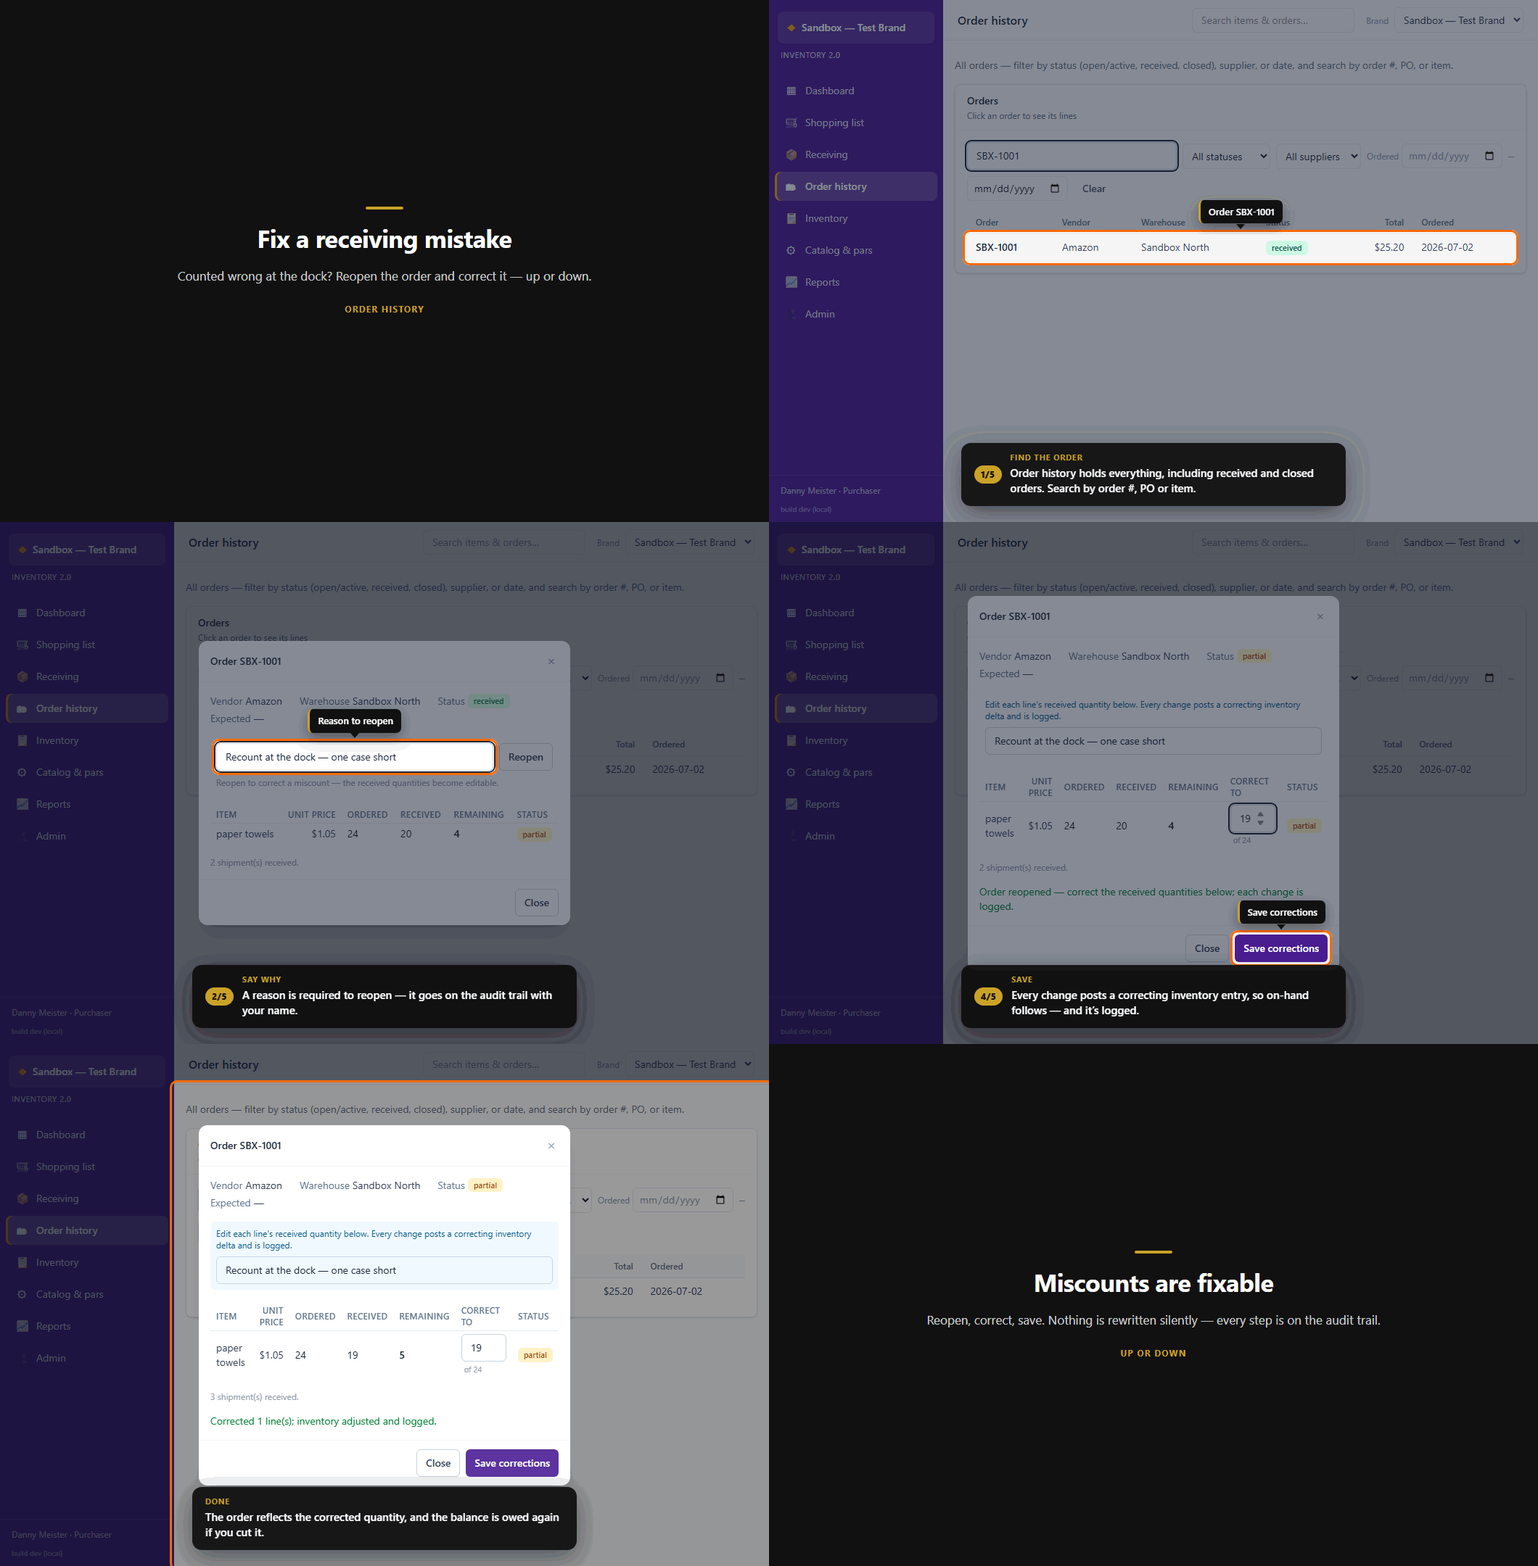
The received quantities become editable, and you can correct them up or down. Every change posts a correcting inventory entry so on-hand follows, and the reason goes on the audit trail with your name. If you cut a quantity, the balance is owed again and the order reopens for it.
Set targets — Catalog & pars
Pars are the targets that drive the shopping list. Item settings (search term, quality lock) are shared across locations; par and reorder point are per location, so check the Warehouse picker first.
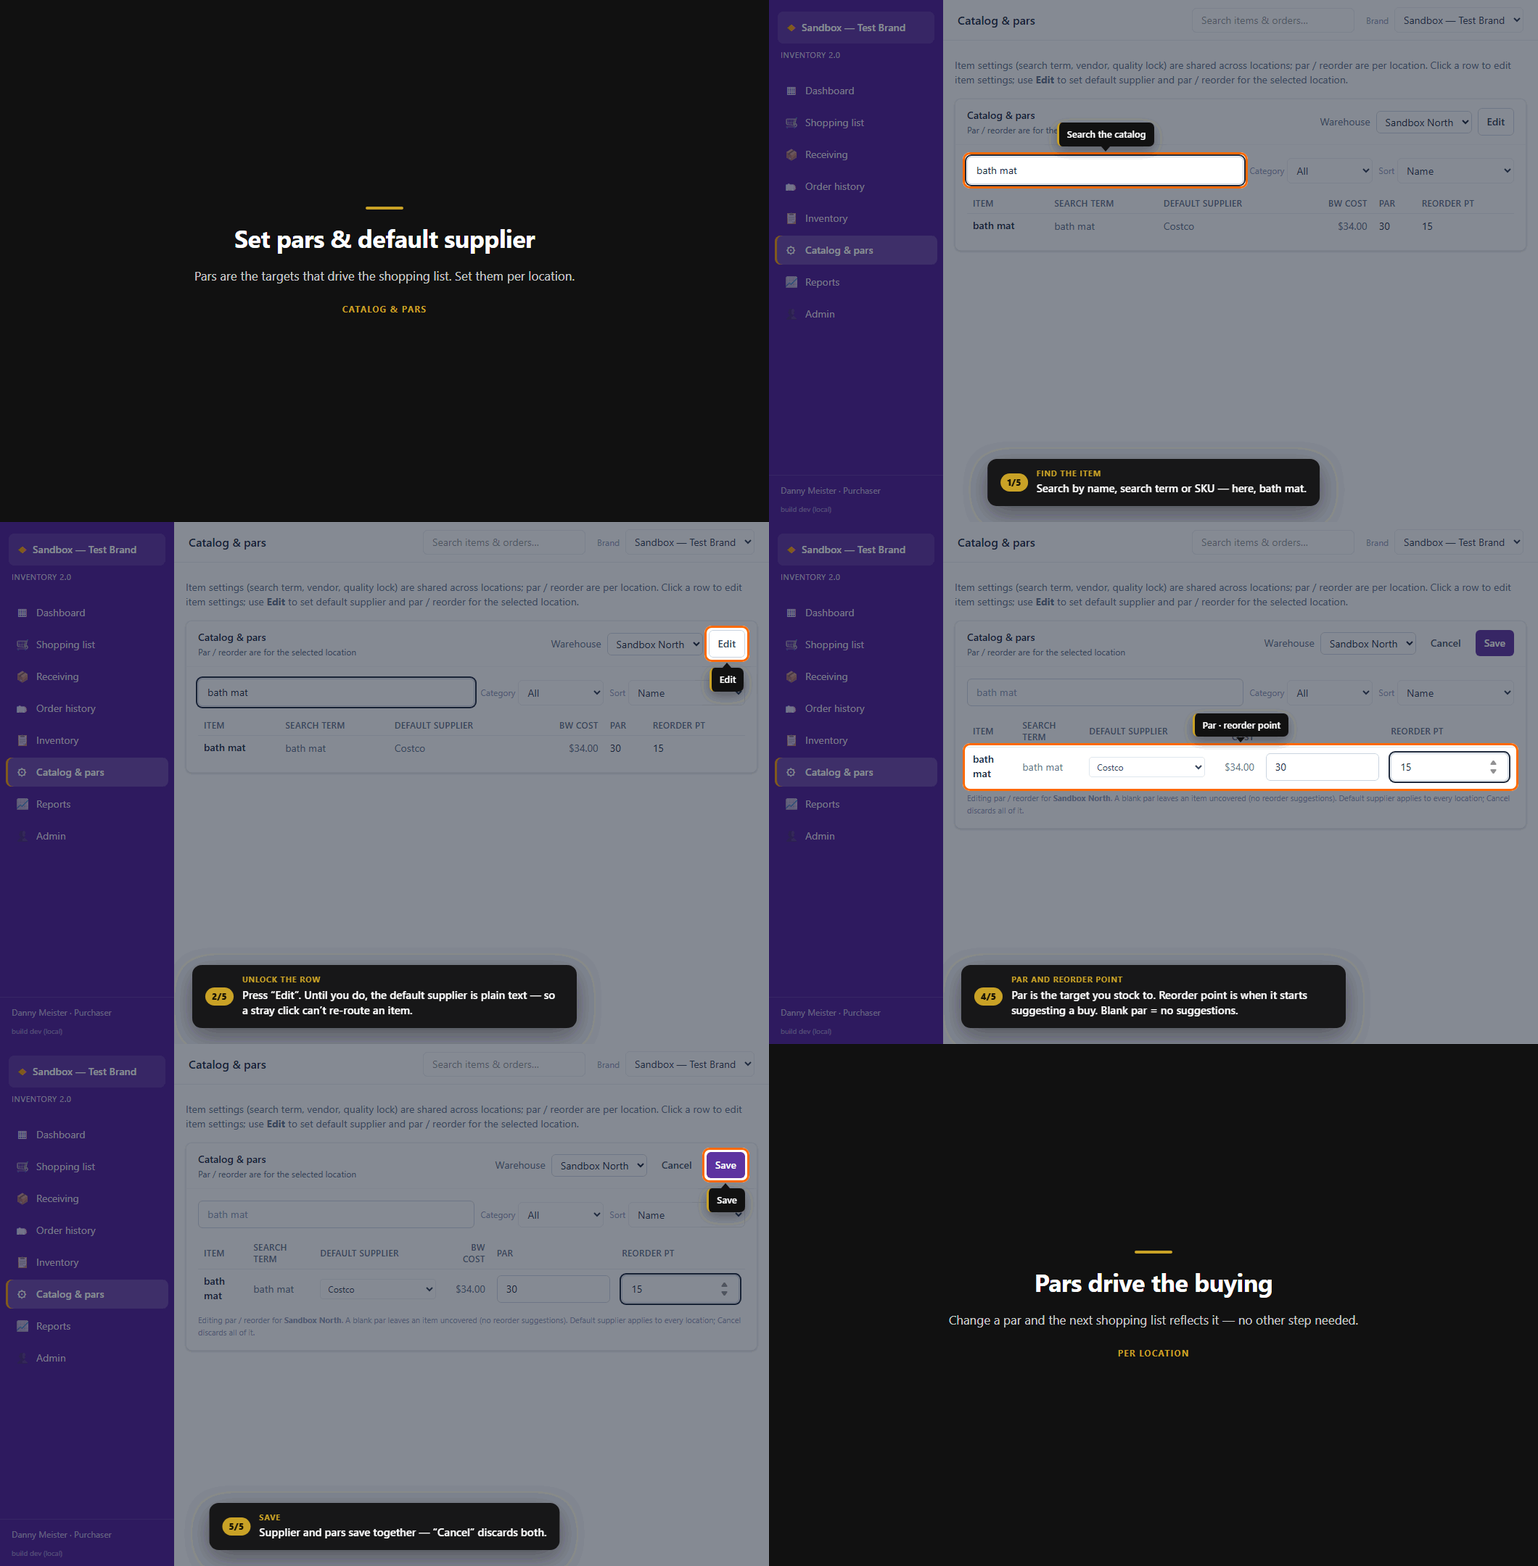
Press Edit to change things. Until you do, the Default supplier is plain text — deliberately, so a stray click on a 400-row table can't quietly re-route an item to a different supplier. Supplier and pars then save together on Save, and Cancel discards both.
- Par is the level you stock to. Reorder point is when the tool starts suggesting a buy. A blank par leaves the item uncovered — it will never be suggested.
- Default supplier is who the item normally comes from; it's how the shopping list groups the line.
- The table also shows BW cost — the cost Breezeway has on record.
What the item settings do
Click the row itself (not "Edit") to open an item's own settings. These are shared across every location, and a few of them quietly drive behaviour you've already seen elsewhere.
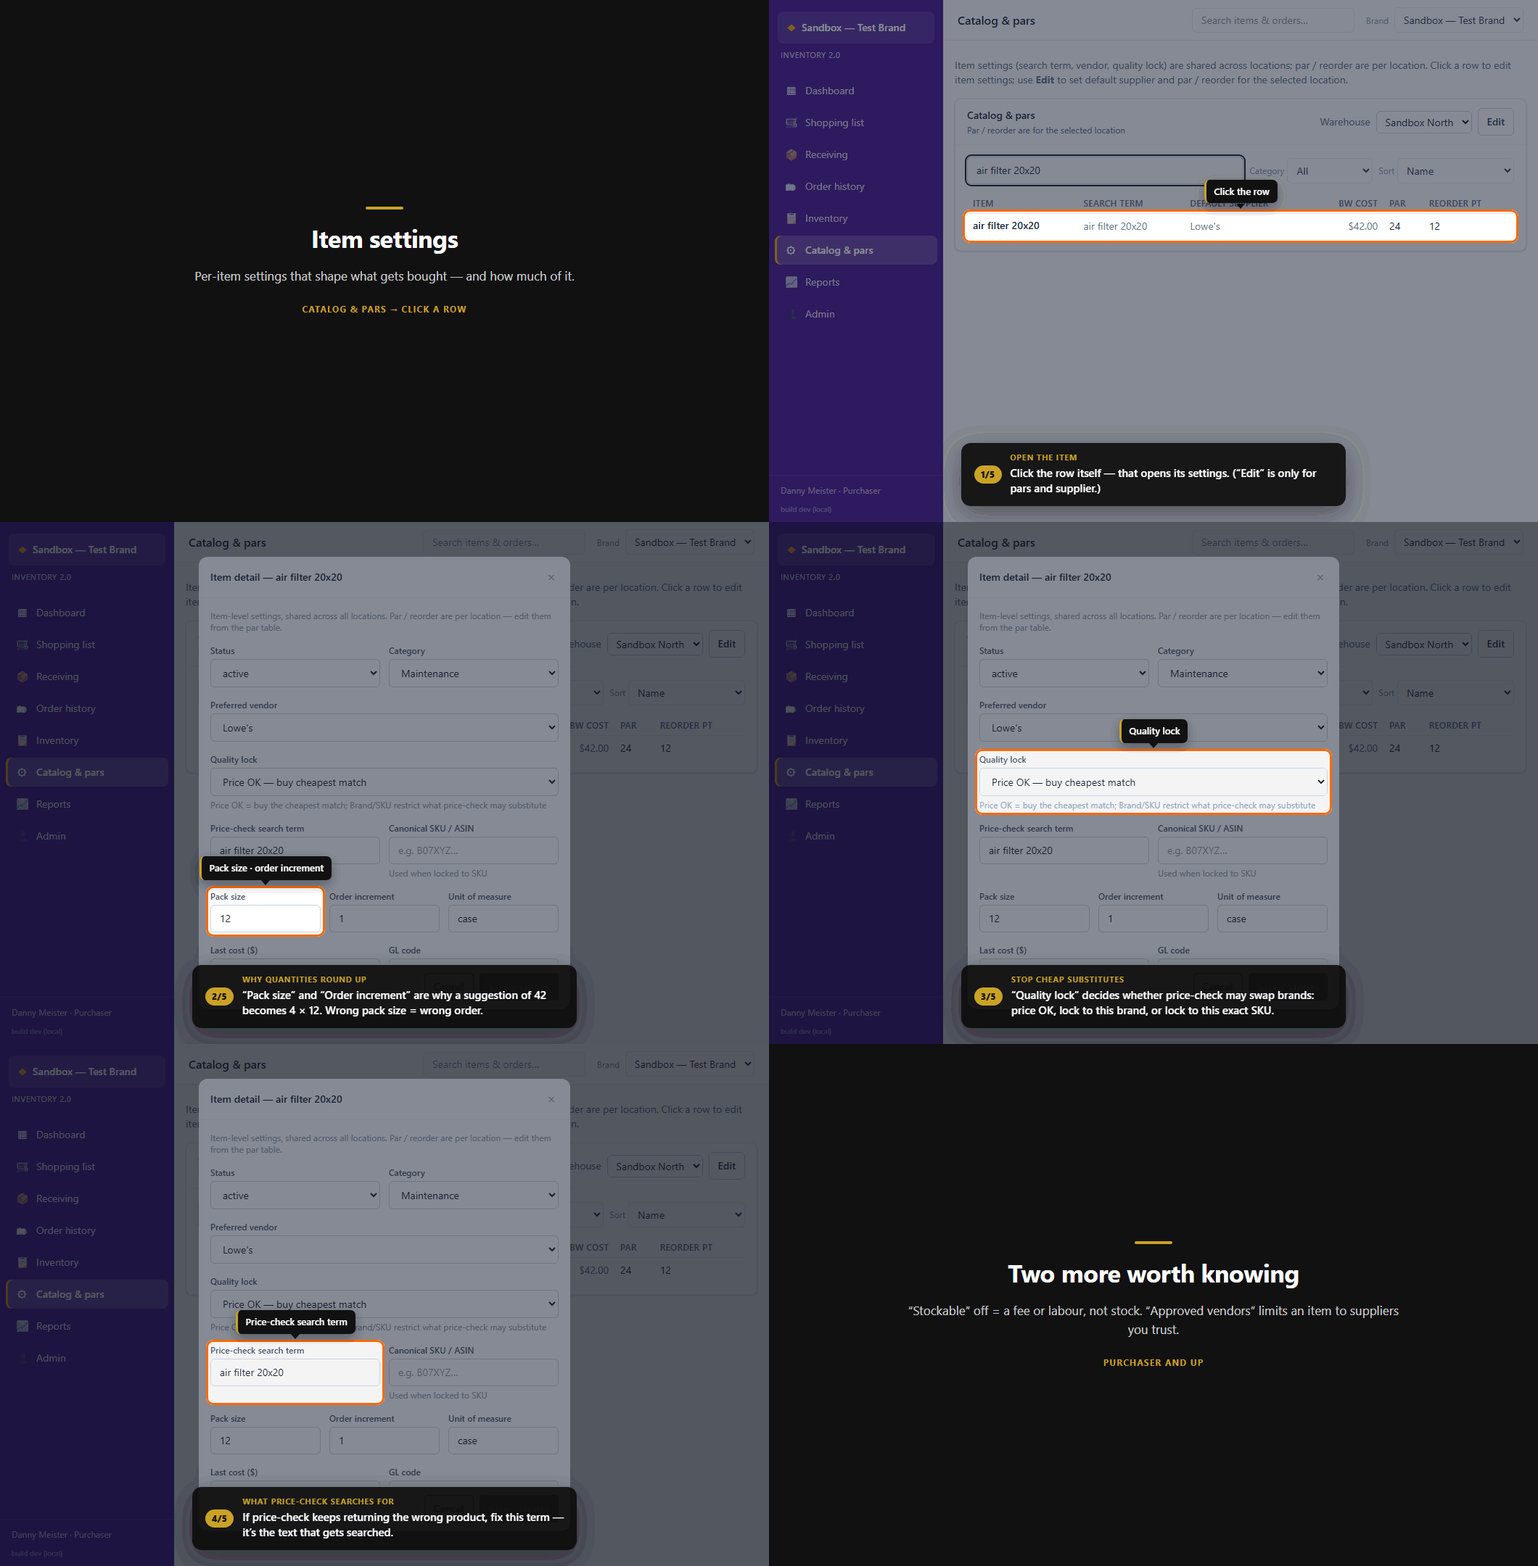
- Pack size and Order increment are why a suggested 42 becomes 4 × 12. If a pack size is wrong, every order for that item is wrong.
- Quality lock decides whether price-check may substitute: Price OK buys the cheapest match, or you can lock the item to that brand, or to that exact SKU. This is how you stop a cheap substitute arriving in a guest unit.
- Price-check search term is the text that actually gets searched. If price-checking keeps returning the wrong product, fix this. Saving a new term throws away the prices the old term found — they were answers to the wrong question. The tool tells you it did, and you then re-run Price-check selected on the shopping list to shop the item again. The same applies to changing pack size or the quality lock, since those change what counts as a match.
- Stockable off means it's a fee or labour rather than stock. Approved vendors limits the item to suppliers you trust.
Look things up — Order history & Reports
- Global search (top of every page) is the fastest lookup — type an item or order and it jumps you straight to Catalog or Order history.
- Order history: all orders; filter by status (including open), supplier, date, or search by order #, PO, or item. Order detail shows the unit price you actually paid, not a catalog or live price.
- Reports: spend over time, spend by supplier, and supplier lead times. Every number depends on the date range you pick at the top, so set that first.
- Items received above their Breezeway cost show up on the Dashboard, not in Reports — as a nudge to update the cost in Breezeway.
Brand settings — Admin (Site/Monarch Admin only)
Setting up the brand itself — suppliers, locations, categories and the Breezeway mapping — has its own part: Admin: running a brand.
Admin: running a brand
For Site Admins (and Monarch Admins). Everything here is on the brand's Admin page and applies to the brand you're currently switched to.
Suppliers
Each brand chooses which suppliers it actually buys from, and sets its own delivery expectations for them — Amazon to Hawaii is not Amazon to Tennessee.
- Add from master list activates a supplier that Monarch already holds. Use this first; it needs nobody's help.
- Adding a brand-new supplier to the master list is Monarch Admin only, so that button simply isn't there for a Site Admin — that's by design, not a fault. Ask your Monarch admin and it becomes available to every brand.
- Expected days / stale after drive the "past its expected delivery window" flag on the Dashboard. If a supplier is always slow, raise these rather than living with false alarms.
- Deactivating a supplier warns you first and tells you how many items it's the default supplier for — those items lose their default, so re-set them afterwards in Catalog & pars. Orders and history are never touched, and it's reversible.
Inventory locations
- Add one with a name, a type (warehouse / cabin / property / other) and an address.
- Renaming is safe. Pars, on-hand, and every order and count stay attached, because they're tied to the location's identity rather than its name. A warehouse move is just a rename — there's no transfer to do and no history to reattach.
- To retire a location, untick Active. Its history stays. Fully deleting a location is Monarch-Admin-only, and rarely what you want.
People on this brand
Add the people who work on this brand and set what each of them can do. Everything here is scoped to this brand only.
- + Add person takes a work email, an optional name, and a role. A gomonarch.com address can sign in with Google immediately; anyone else is emailed a link to set a password. If that email fails, you'll be told.
- resend invite (next to the Sign-in badge) sends a fresh set-password email.
The original link expires, so this is what to use when someone says they never
got in — including days or weeks later. Never add the person a second time; that
won't help and leaves you with a duplicate to clean up. Safe to click more than
once, and it doesn't change anything about their account or role.
- Only appears for outside users. A gomonarch.com person signs in with Google and has no password to reset — if they can't get in, it's their Google account or their brand access, not the invite.
- Greyed out for a deactivated person: they'd get a working login with no access. Only a Monarch admin can reactivate them.
- Role on this brand changes what they can do here. You can only assign roles at or below your own, so a Site Admin can appoint another Site Admin but not a Monarch Admin. If someone's current role is above yours, the row is read-only and says so.
- Remove takes away their access to this brand. It does not delete their account or affect other brands they work on — a regional buyer keeps their other brands. Cutting someone off from every brand at once is Deactivate, on the Monarch users page, so ask a Monarch admin for that.
- A brand must always keep at least one administrator, so removing or demoting the last one is refused. Give someone else an admin role first.
Changes take effect the next time the person signs in. If they're already signed in, they need to sign out and back in — a refresh isn't enough.
Catalog categories
Breezeway sends categories as raw codes. Rename a code here and every item carrying it follows. This is the fix when the whole catalog reads "Uncategorized" — expand a code first to see which items it covers.
Breezeway property → location mapping
This decides which inventory location a property's usage is drawn from. It's by property group, and any properties not yet covered are called out as held. Sync now refreshes this brand's catalog, costs and routing from Breezeway. That already runs daily at 06:00 UTC, so use this only when you need it the same day.
Admin: Monarch (org-level)
For Monarch Admins only, and only while you're switched to the Monarch parent brand — the org pages are hidden from inside a normal brand.
Brands
The registry of brands. Add one (code, name, colours), edit it, or jump straight to any brand's dashboard or admin page. A brand's code is what shows up in URLs and integration config, so it's worth getting right first time.
Users & access
Add a user by email and name, then grant them a role per brand — one row per user per brand, so a regional buyer can be a Purchaser at two brands and have no access to a third. Setting a brand to "— no access —" removes that grant. Access takes effect on the user's next sign-in; an existing session needs a full sign-out and back in, not a refresh.
The roles ladder is in Roles at a glance. Grant the lowest rung that lets someone do their job — a counter needs Field/HK, not Site Admin.
The Sign-in column shows how each person gets in. Outside users have a
Resend invite button: the set-password link they were originally emailed
expires, so this is the fix when someone never clicked theirs and is now locked
out. gomonarch.com users show Google SSO instead, because there's no password
involved.
Offboarding someone
The Access column has Deactivate — the single off-switch. It revokes access to every brand at once, and their brand assignments are kept, so Reactivate puts everything back exactly as it was. Use it in preference to removing brands one at a time: it's one click, it can't be half-done, and it's reversible.
There is deliberately no delete. A user is referenced by the history they created — counts, orders, receipts — so deleting them would either destroy that history or leave it unattributable. Deactivate is the intended end state for someone who has left.
⚠️ Deactivating does not disable their login. It removes their access, so they reach the app and see nothing. Someone determined could still sign in successfully. For a departure where that matters — a disgruntled leaver, a compromised account — the account itself has to be disabled with the identity provider, which is outside this tool. Ask Danny.
A brand must keep at least one administrator and Monarch must keep at least one Monarch Admin, so deactivating the last one is refused with an explanation. Grant admin to someone else first.
A Site Admin can also manage their own brand's people, from that brand's Admin page — see People on this brand. This org page is the cross-brand view, and the only place a Monarch Admin can be granted.
Global vendors (the supplier master list)
One Monarch-governed list of supplier identities, so the shared price history references one supplier rather than fifteen spellings of "Amazon".
- Add a supplier, optionally ticking which brands may use it straight away. Adding it with no brands ticked parks it on the master list for later.
- Brands opens a picker for which brands may buy from that supplier. Unticking a brand only deactivates the link — that brand's lead-time settings are preserved, so re-ticking restores them.
- Rename applies everywhere and rejects a name that already exists.
- Remove decides for itself: a supplier that has never been ordered from is deleted outright; one with order history is deactivated for every brand instead, so the history stays intact. The counts shown next to each supplier tell you which case you're in before you click.
What's not built yet
So you don't go hunting for these:
- "Override a property" in the Breezeway mapping card is visible but disabled — routing is by property group only for now.
- Cross-brand / global reporting and org settings are placeholders.
- Barring a sign-in outright. Deactivate removes all access, but the person can still authenticate and land on an empty app. Disabling the account itself happens with the identity provider, not here — see Offboarding someone.
- Deleting a user. Not planned: they're referenced by the history they created. Deactivate is the intended end state.
- Over-receipt at the dock — you can't receive more than was ordered on the receive form. If a supplier over-shipped, receive what was ordered, then use Reopen → correct to record the true figure.
If something looks wrong
- A number looks off / stock seems stale on the shopping list → click Refresh from current stock; if it persists, re-count the item (Walk & Count).
- "This action requires the … capability" → your role doesn't include that action; ask a Site Admin.
- A line says "set price" and there's nothing to compare → that's expected with no price history. Enter the price manually (above).
- "Price-check selected" comes back with nothing → live price lookups are on, so this is worth reporting rather than shrugging off. First try Suppliers: all (an approved-only list can hide every result) and check the item's search term — a bare term like "dish soap" genuinely finds nothing useful. If a specific term returns nothing across several items, say so. Enter the price by hand to keep ordering meanwhile.
- An item is missing from Inventory or the Shopping list → check Catalog & pars first. If it's there, it almost certainly has no par for that location — see Why an item isn't showing up yet.
- On hand dropped and nobody touched it → that's the daily usage job, around noon Eastern. See What runs on its own, and when.
- Every item shows as "Uncategorized" → that brand's categories are still raw Breezeway codes. The filter still works. A Site Admin can fix this themselves in Admin → catalog categories: rename each code to a real name and every item carrying it follows. (Expand a code first to see which items it covers.)
- You can't sign in → confirm you're using your company Google account; if your email domain isn't recognized, contact the admin below.
- You're an outside user and your invite link no longer works → it expired. Ask your Site Admin (or the Monarch admin below) to hit resend invite on your row — a fresh email arrives and nothing about your account or access changes.
- The app looks empty right after signing in → sign out and back in once (this refreshes your access). A plain refresh isn't enough.
- A page looks out of date → hard-refresh (Ctrl+Shift+R). The build stamp in the bottom-left corner of the sidebar tells you which version you're on.
Who to contact
- Access / roles / can't sign in: Danny Meister — dmeister@gomonarch.com
- Something's broken or a number is wrong: Danny Meister — dmeister@gomonarch.com
About the recordings
The GIFs live in docs/media/ and are generated, not hand-captured — the
scripts are in docs/media/recorder/. When a screen changes,
re-run the matching script instead of re-shooting it by hand; see
media/recorder/README.md.
Generated from docs/USER-MANUAL.md. Screens are recorded
against a test brand, so item names and quantities are examples.